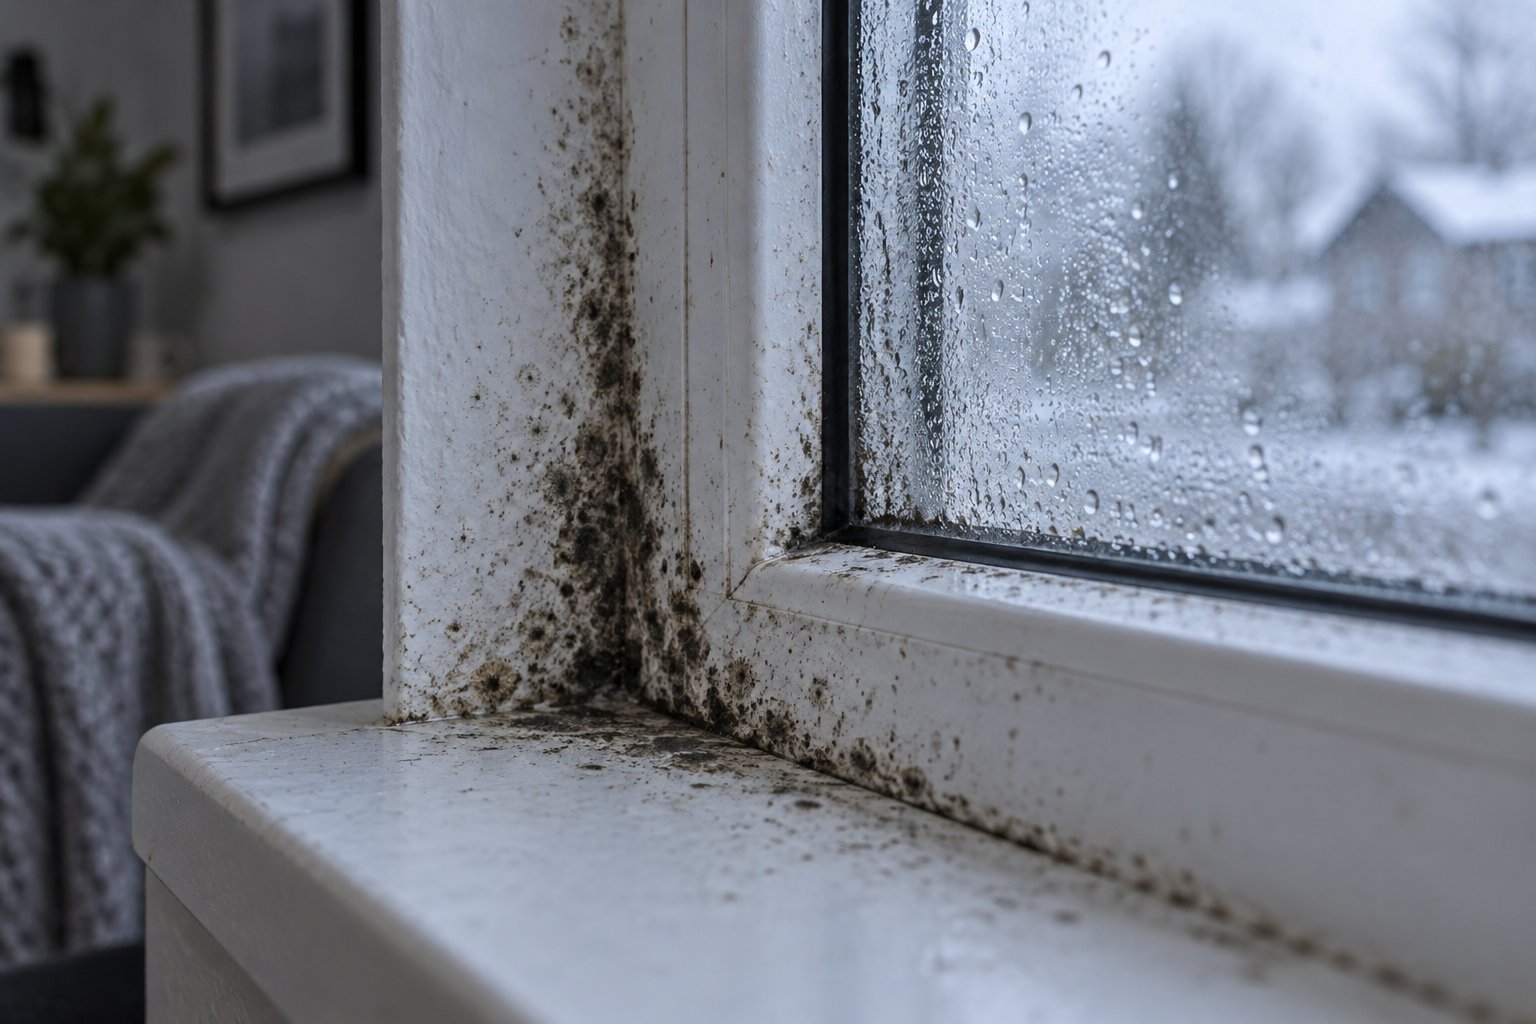
You wipe it away on Monday, and by Friday it is back. That dark, patchy growth creeping along your window frames is not just an eyesore — it is a signal your home is trying to send you. Mould on window frames is fungal growth that feeds on moisture and trace organic matter deposited on or around the frame surface. Dust, paint residue, even fingerprints supply enough nutrition once persistent dampness enters the equation.
What makes window frames different from, say, a bathroom ceiling? Frames sit at the exact boundary where heated indoor air collides with the coldest surface in the room. This collision creates a unique microclimate. Warm, moisture-laden air cools rapidly against the frame, drops below its dew point, and surrenders water droplets directly onto the material. The result is a consistently damp zone — an open invitation for spores that are already floating through every home.
General household mould can appear almost anywhere moisture lingers, but window-frame mould is distinct in its cause and behaviour. It is driven primarily by mold from window condensation rather than by leaks or flooding. Because frames bridge the interior and exterior of a building envelope, they experience sharper temperature gradients than interior walls. This means condensation recurs daily during colder months, giving fungal colonies a reliable water source most other surfaces never provide. You might also notice mold on windowsill surfaces where water pools after running down the glass — another micro-zone that stays wet long enough for spores to establish.
Whether your frames are timber, uPVC, or aluminium, the underlying trigger is the same: too much moisture meeting too cold a surface. Understanding that distinction is critical, because it shifts the conversation from "how to clean mold on window sills" to "why is this moisture here in the first place?"
Ignoring even a small patch carries real consequences. On the health side, airborne spores released by active colonies can trigger respiratory irritation, allergic reactions, and aggravate asthma — particularly in children, older adults, and anyone with compromised immunity. Structurally, wooden frames absorb moisture deep into the grain, softening the timber and inviting rot that undermines the frame's integrity over time. Even on non-porous materials like uPVC, persistent mould degrades seals and discolours surfaces in ways that no amount of scrubbing fully reverses.
Mould on window frames is almost always a ventilation or insulation problem — not a cleaning problem.
That single idea reframes the entire approach. Reaching for a spray bottle without addressing why condensation forms guarantees the problem returns — often within days. Knowing whether you are dealing with black mold vs mildew on window sills, understanding what happens when mold develops between window panes, and selecting the right removal method for your specific frame material all matter far more than choosing the strongest bleach on the shelf.
This guide walks through each of those layers: visual identification, root-cause diagnosis, material-specific cleaning, solution matching, hidden trouble spots most homeowners overlook, a season-by-season prevention calendar, and the ventilation strategies that stop the cycle for good. The goal is not to sell you new windows — it is to help you understand the building science behind the problem so you fix the right thing, once.
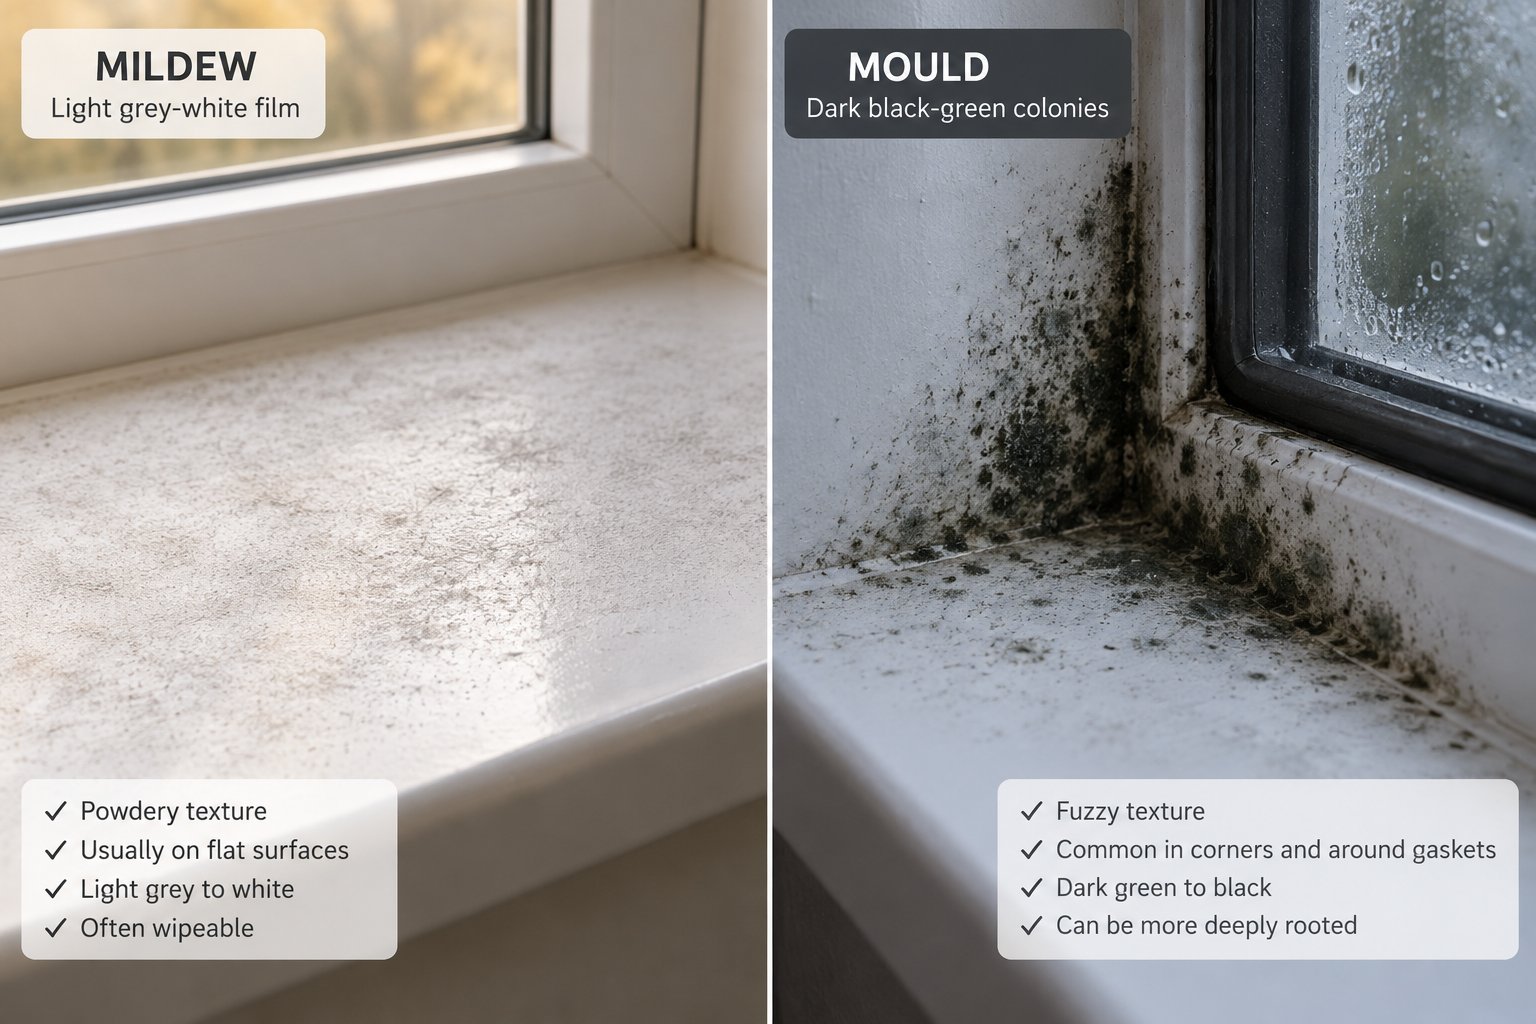
Before you grab a cleaning product, take a closer look at what is actually growing on your frames. That discolouration could be mildew, mould, or sometimes just accumulated grime — and the difference matters more than most homeowners realise. Misidentifying mold on a window sill can lead you to the wrong product, the wrong technique, and wasted effort. Worse, it can leave a deeper fungal problem quietly spreading beneath the surface while you assume the job is done.
The distinction also determines urgency. Surface mildew is a maintenance issue you can tackle in ten minutes with household supplies. Embedded mould, on the other hand, may demand material-specific treatment or even professional intervention — especially when it appears on a door frame or spreads behind gaskets you cannot easily see.
Imagine running your finger along a grey-white, powdery patch on your windowsill. It smears easily, almost like chalk dust. Compare that to a dark green or black patch that feels slightly fuzzy or slimy and resists a casual wipe. Those two textures point to fundamentally different organisms with different risk profiles.
Mildew is technically a type of fungus, but it behaves very differently from what most people call "mould." It colonises the surface only, rarely penetrating into the substrate beneath. Mould, by contrast, sends root-like structures called hyphae deep into porous materials — particularly wood — making it far harder to remove and far more damaging over time.
Here is a side-by-side breakdown to help you identify what you are dealing with:
| Characteristic | Mildew | Mould |
|---|---|---|
| Colour | White, grey, or yellowish | Green, black, or dark brown |
| Texture | Powdery or dusty | Fuzzy, slimy, or raised |
| Smell | Mildly musty | Sharply earthy or pungent |
| Depth of penetration | Surface-level only | Penetrates into substrate |
| Common locations on frames | Flat sill surfaces, glass edges | Corners, gaskets, wood grain, silicone joints |
| Health risk level | Low to moderate (irritation) | Moderate to high (respiratory, allergic reactions) |
Wondering about that brown stuff on a window sill that does not quite look like either category? Brownish or rust-coloured patches can sometimes be early-stage mould, tannin staining leached from damp timber, or even residue from degraded sealant. If the patch has any texture or smell, treat it as potential mould until you confirm otherwise.
A quick at-home test can settle the question in minutes. Dip a cotton swab or soft cloth in a small amount of diluted household bleach — roughly one part bleach to ten parts water. Dab it onto the discoloured patch and wait two to three minutes.
Both results call for action — mildew left unchecked in a damp microclimate will eventually deepen into true mould. The critical difference is what comes next. Surface mildew responds well to gentle household cleaners. Mould that fails the swab test demands a more aggressive and material-aware removal process, because the wrong approach can damage your frames while leaving spores alive beneath the surface.
Knowing how to remove mold from window sills effectively starts with this identification step. Skip it, and you risk either over-treating a simple mildew film with harsh chemicals that damage your frame finish, or under-treating a serious mould colony with a product that never reaches the root of the growth. Either mistake sends you right back to the same frustrating cycle — which raises the next logical question: what is actually creating the moisture that feeds these colonies in the first place?
You have identified the growth, confirmed it is mould rather than surface mildew, and scrubbed the frame clean. Two weeks later, those same dark patches are creeping back along the sill edge. The frustration is real — and extremely common. Understanding why requires looking past the mould itself and into the physics happening at the surface of your window frame every single day during cooler months.
Every volume of indoor air holds a certain amount of water vapour. The warmer the air, the more moisture it can carry. The dew point is the temperature at which that air becomes fully saturated and starts surrendering its moisture as liquid water on any surface cold enough to trigger the change.
Here is where window frames enter the picture. At typical indoor conditions — around 68°F with 50% relative humidity — the dew point sits near 48°F. Any surface colder than that threshold collects water droplets. Your walls, insulated and buffered from outdoor temperatures, rarely drop that low. Your window frames, however, are a different story. Glass and framing materials conduct heat far more readily than insulated walls, making them consistently the coldest surfaces in a room. On a cold morning, a single-pane window surface can plunge to 40-45°F — well below that dew-point line — and even a standard double-pane unit may only reach 50-55°F along the sill edge.
That thin film of condensation is all mould needs. Dust, skin cells, pollen, and cooking residue carried by indoor air settle on the sill and mix with that moisture, creating a damp organic layer. Spores already floating through the room land on this ready-made growth medium and can form visible colonies within 24 to 48 hours. Wipe it away, and the same physics recreate the same conditions the following night. The mould is not the problem — the cold, wet surface is.
If your frames are aluminium without a thermal break, you are dealing with one of the most efficient cold conductors in residential construction. Metal frames act as a direct thermal bridge, channelling frigid outdoor temperatures straight through to the interior surface. The result is a frame that stays colder than the surrounding wall, pulling moisture out of the air like a magnet. This is a major reason black mould window sills appear more frequently on older aluminium-framed windows than on modern thermally broken designs.
Glazing condition matters just as much. Single-glazed windows offer almost no insulation, and failed double-glazed units — where the seal between panes has blown and the insulating gas has escaped — perform only marginally better. That black dust on window sill surfaces that homeowners sometimes notice alongside mould is often a combination of degraded sealant particles and trapped spore debris, signalling both a biological problem and a failing window assembly.
Poor installation compounds everything. Gaps between the frame and the surrounding wall where insulation is missing or sealant has cracked create additional cold spots and allow moisture-laden air to reach surfaces it was never supposed to contact. Searching for how to get rid of mold on window sill growth without addressing these structural weak points is essentially treating a symptom while the cause runs unchecked.
Here are the five most common root causes behind recurring mold in window sills and frames:
No anti mould spray in the world changes these underlying conditions. Spraying a biocide onto a frame that drops below dew point every night is like mopping a floor while the tap is still running. The colonies return because the environment that supports them never changed. Real prevention means raising that surface temperature above the dew point, reducing indoor humidity, or — ideally — both. The question then becomes practical: when the mould is already there, how do you remove it without damaging the frame material itself?

The frame material sitting in front of you changes everything about how you should approach removal. A technique that rescues a wooden sash could permanently scar a uPVC profile, and a product safe for vinyl may corrode an aluminium finish beyond repair. Yet most cleaning advice treats all frames identically — a single recipe applied to every surface. That generic approach is exactly why so many homeowners end up with damaged finishes, recurring growth, or both.
Whether you are tackling black mold on a window sill, scrubbing discolouration from gasket edges, or even dealing with mold on blinds that hang against a damp frame, the cleaning method must respect the material underneath. Here is how to handle each type safely and effectively.
Wood is porous, and that porosity is both its charm and its vulnerability. Mould does not just sit on timber — it threads hyphae deep into the grain, feeding on the cellulose fibres themselves. Surface cleaning alone rarely solves the problem once colonies have taken hold.
A critical warning upfront: never use undiluted bleach on wood. Bleach destroys wood fibres, raises the grain, and leaves a weakened surface that re-absorbs moisture faster than before — essentially accelerating the next outbreak.
If mould has penetrated deeply enough that sanding reveals continued discolouration well below the surface, or if the wood feels soft and spongy, the damage likely requires professional assessment. At that point, you are dealing with structural decay rather than a cleaning job.
Good news here: uPVC is a non-porous material, meaning mould cannot penetrate its surface. The colonies you see are feeding on organic deposits — dust, grease, pollen — sitting on top of the plastic, not digesting the frame itself. That makes removal more straightforward, but there are still pitfalls to avoid.
The biggest mistake? Reaching for abrasive scouring pads. Scrubbing uPVC with coarse pads creates micro-grooves invisible to the naked eye. Those tiny scratches trap moisture and spore material, turning a smooth, easy-to-clean surface into one that harbours mould in places you can no longer effectively reach.
Avoid bleach on uPVC entirely. While it does kill surface organisms, it causes permanent yellowing that cannot be reversed — a point emphasised by professional remediation standards. The goal is to clean the mould without creating new problems.
Aluminium itself is naturally inhospitable to mould. Its non-porous, inorganic surface offers nothing for spores to feed on. So why do aluminium frames still develop mould? Because the components surrounding the metal — thermal-break inserts, rubber gaskets, silicone seals, and the organic grime that accumulates in joints — absolutely do support fungal growth.
When you are figuring out how to clean mold off windows with aluminium frames, the focus should shift from the metal to these vulnerable secondary materials.
Composite frames add another layer of complexity. These frames blend materials — often timber cores with aluminium or polymer cladding — and their surface coatings vary widely between manufacturers. If you cannot identify the exact coating, follow the manufacturer's maintenance guide before applying any cleaning solution. An aggressive product safe for raw aluminium could strip a protective lacquer from a composite profile.
Knowing how to remove mold from windowsill surfaces across different materials is essential, but the cleaning product you choose matters just as much as the technique. The wrong solution paired with the wrong frame creates damage that outlasts the mould itself — which raises a practical question: which cleaners are safe for which materials, and which combinations should you avoid entirely?
You know how to remove mould from your specific frame type. The next decision — which cleaning solution to pair with that technique — is where many homeowners unknowingly cause lasting damage. Pouring bleach onto a wooden sash, scrubbing baking soda paste across a glossy uPVC profile, or spraying an acidic cleaner onto powder-coated aluminium can leave you with a frame that looks worse than it did with the mould still on it.
The challenge is that most advice around mouldy windows treats every cleaning product as universally safe. It is not. Each solution has a specific chemical action, and each frame material has a specific vulnerability. Matching them correctly is half the battle when figuring out how to clean window sills without creating secondary problems.
Six solutions cover the vast majority of DIY mould removal scenarios. Some are kitchen-cupboard staples, others come from a hardware store shelf. Their effectiveness varies significantly depending on whether the mould sits on the surface or has rooted into the substrate — and whether your frame can tolerate the chemistry involved.
| Solution | Best For (Frame Material) | Effectiveness on Surface Mould | Effectiveness on Deep Mould | Safety Warnings | Cost Level |
|---|---|---|---|---|---|
| White vinegar (undiluted) | Wood, uPVC, aluminium | High — kills over 80% of mould species | Moderate — penetrates grain on wood but limited on deep colonies | Mild acid; avoid prolonged contact with natural stone sills; strong odour | Very low |
| Baking soda paste | Wood, aluminium (with caution) | Moderate — lifts surface colonies through gentle abrasion | Low — does not penetrate substrate | Mildly abrasive; can scratch uPVC and polished surfaces | Very low |
| Hydrogen peroxide (3%) | Wood, uPVC, aluminium | High — strong oxidiser breaks down spore structures | Moderate to high — better substrate penetration than vinegar | Can lighten dark-stained wood; test in hidden area first | Low |
| Diluted bleach (1:10 ratio) | uPVC and vinyl only | Very high — rapid kill on contact | Low — surface action only; does not penetrate porous materials | Destroys wood fibres; pits aluminium finishes; yellows white uPVC over time; never mix with vinegar or ammonia | Low |
| Tea tree oil solution (1 tsp per cup of water) | uPVC, aluminium, sealed wood | Moderate to high — natural antifungal with residual inhibiting effect | Low — limited penetration depth | May stain untreated or light-coloured wood; strong scent; higher cost per application | Medium |
| Commercial anti-mould sprays | Varies by product formulation | High — purpose-formulated for rapid mould kill | Moderate — some products include penetrating surfactants | Check label for material compatibility; ensure ventilation; some contain bleach-based actives | Medium to high |
A few patterns stand out immediately. White vinegar and hydrogen peroxide are the most versatile options — safe across all three major frame materials and effective enough for most surface-level mold on windows. Diluted bleach delivers the fastest visible kill, but its material restrictions make it a poor default choice. Commercial sprays offer convenience and sometimes superior penetration, yet their active ingredients vary widely; always read the label to check compatibility before spraying onto any frame.
For anyone dealing with mold on window frame surfaces that resist gentler treatments, a two-step approach often works best: start with white vinegar or hydrogen peroxide to handle the bulk of the colony, then follow with a targeted commercial spray rated for your frame material to address stubborn remnants. This layered strategy avoids over-relying on a single harsh product while still delivering a thorough clean.
Getting the right match matters. Getting the wrong match can be expensive. Here are the critical combinations to steer clear of:
Choosing the wrong cleaning solution for your frame material can cause more damage than the mould itself.
When in doubt, patch-test. Pick a small, hidden section of the frame — the underside of the sill, the back edge of a casement, or a spot behind a curtain bracket — and apply your chosen solution there first. Wait 24 hours and inspect for discolouration, softening, or surface changes before committing to a full application. This simple step takes almost no effort and can save you from an irreversible mistake on a visible surface.
With the right product now paired to your frame material, there is one more factor most homeowners overlook: location. Mould does not always grow where you can see it. Some of the most persistent colonies thrive in hidden micro-environments around the window — drainage slots, gasket folds, silicone joints — where no cleaning spray reaches unless you know exactly where to look.
You have cleaned the visible frame surface, matched the right solution to your material, and wiped everything dry. The sill looks spotless. Yet three weeks later, a faint musty smell drifts from the window corner and familiar dark patches reappear. What happened?
The answer is almost always location. Mould on window frames does not limit itself to the surfaces you see every day. Some of the most stubborn colonies thrive in micro-environments hidden within the frame assembly itself — drainage channels no wider than a pencil, rubber gaskets folded over on themselves, and silicone joints tucked between the frame and the surrounding wall. These spots stay perpetually damp, shielded from airflow, and completely invisible during a standard wipe-down. Unless you deliberately inspect them, they act as reservoirs that re-seed every surface you just cleaned.
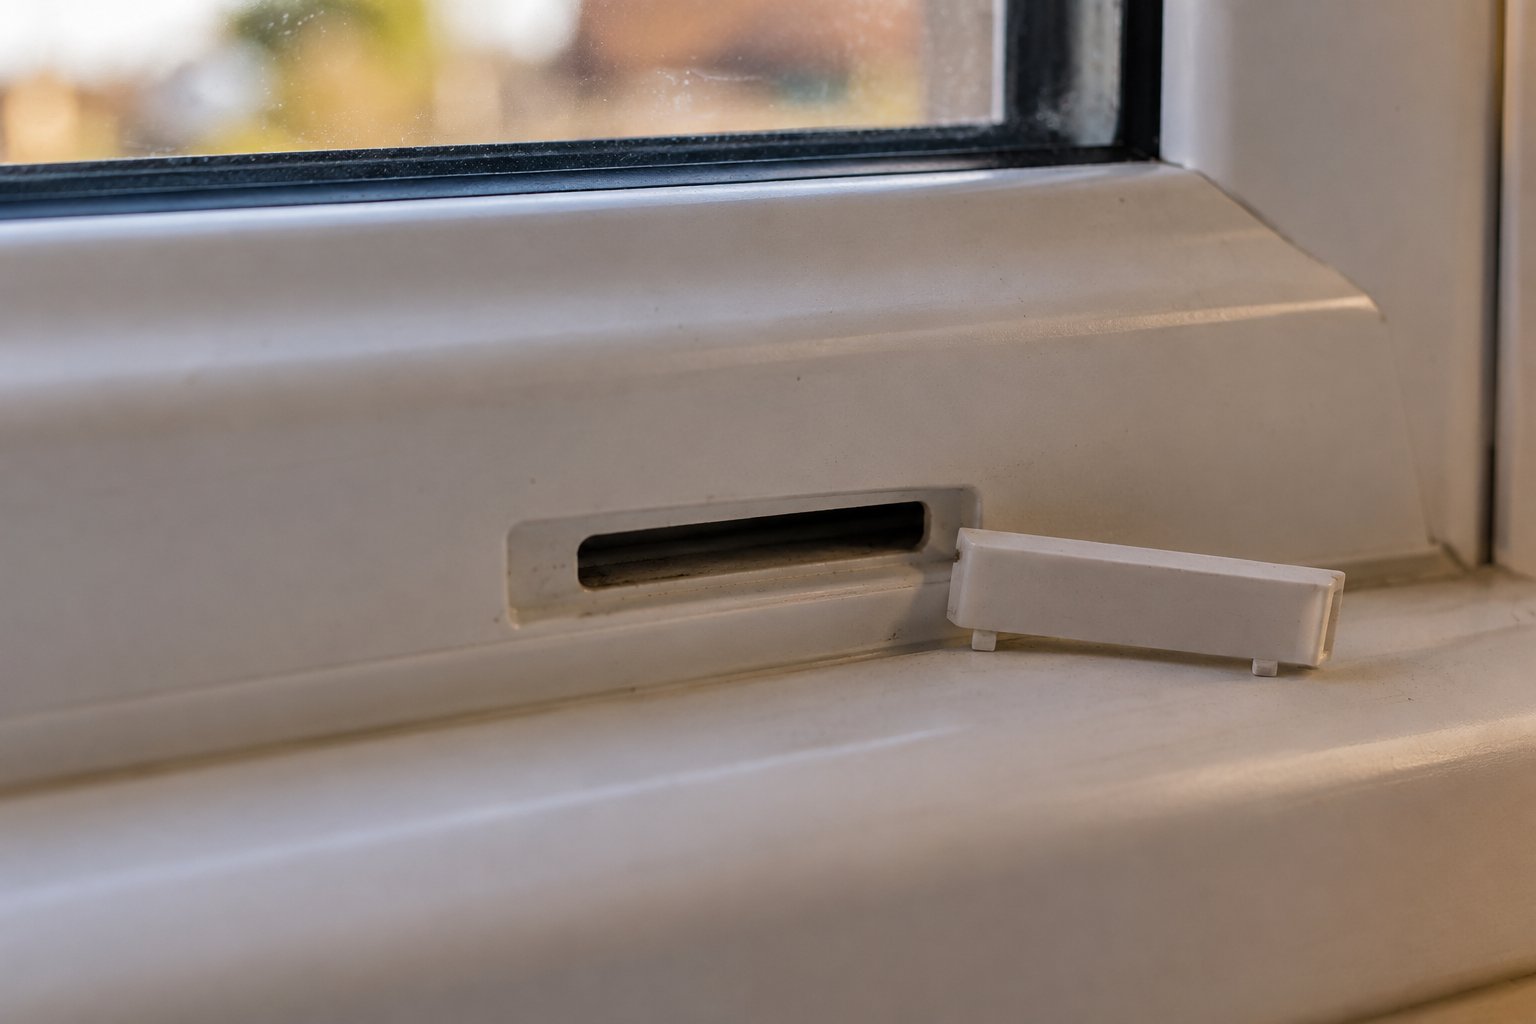
If you have uPVC windows, flip open the small plastic caps along the bottom outer edge of the frame. Underneath, you will find narrow slots called weep holes — engineered drainage channels designed to route condensation and incidental rainwater from inside the frame track to the outside. It is a clever system when it works. The problem is that these channels clog easily.
Dust, dead insects, cobwebs, flaking paint, and general outdoor debris gradually pack into these tiny openings. Once blocked, the water they were meant to expel has nowhere to go. It pools inside the frame track, sitting in a dark, enclosed space with zero air movement — essentially a hidden mould incubator running around the clock.
To locate your weep holes, look at the bottom rail of the window frame, both inside and outside. Most uPVC systems have at least two drainage slots per sash or panel, often covered by small snap-on caps. Pop those caps off and peer inside. If you see dark residue, slimy buildup, or standing moisture, the channel needs clearing. A thin bottle brush, a pipe cleaner, or even a straightened paperclip can dislodge packed debris. Follow up with a flush of warm soapy water poured gently through the channel from the inside, and confirm that water exits freely on the exterior side. This five-minute task eliminates one of the most common hidden causes of recurring condensation and mold on windows.
Rubber gaskets create the weather-tight seal between the glass unit and the frame. Silicone sealant fills the joint where the frame meets the surrounding wall plaster or brickwork. Both materials are flexible, which helps them absorb movement and maintain a seal — but that same flexibility creates folds, lips, and overlaps where moisture wicks in and never fully dries.
Gently peel back the edge of a rubber gasket with your fingertip or a plastic spudger. What you find underneath may surprise you. Dark staining, slimy residue, or fully developed mould colonies are common, particularly on gaskets that have hardened with age and pulled slightly away from the glass or frame. This hidden growth releases spores directly into the room every time the window is opened or air moves across the seal.
Silicone joints deserve the same scrutiny. Run a finger along the internal sealant bead where the frame meets the wall reveal. If the silicone feels soft, tacky, or has pulled away leaving a visible gap, moisture is entering that joint and creating a sheltered growth zone behind it. Those mysterious brown spots on window frames that sometimes appear along the frame-to-wall junction are a telltale sign — they often indicate mould or moisture staining bleeding through from a degraded silicone seal that looks intact from the front but has failed along its bonding edge.
When silicone has blackened through its full thickness rather than just on the exposed face, cleaning will not restore it. Replacing degraded silicone requires cutting out the old bead completely, ensuring the joint is clean and dry, and applying fresh sealant rated for the specific frame and wall substrate. Resealing over wet or mouldy material simply traps the problem behind a new cosmetic layer.
One more spot that escapes routine inspection: the underside of window sills. Condensation running down the glass reaches the sill, pools momentarily, then drips over the front edge. That drip line on the sill's underside stays damp for hours, hidden from view unless you crouch down and look up. Over months of repeated condensation cycles, brown spots on window frames and sill undersides develop into established colonies that go completely unnoticed during everyday cleaning.
Here is a checklist of five hidden mould locations to add to your regular window maintenance routine:
None of these spots require special tools to inspect — just a few extra minutes and a willingness to look where you normally would not. Adding these checks to a seasonal routine, particularly before autumn when condensation season begins, catches hidden growth early before it has the chance to re-contaminate the surfaces you have already worked hard to clean. Speaking of seasons, mould pressure on window frames shifts dramatically throughout the year, and the most effective prevention strategies change with it.
Mould pressure on your windows is not constant — it peaks and dips with the calendar. Condensation hammers your frames from October through March, eases in spring, and practically vanishes during summer when windows stay open and surfaces stay warm. Yet most homeowners apply the same reactive cleaning routine year-round, missing the chance to get ahead of the cycle when it matters most.
A season-specific approach turns mould management from an exhausting loop into a manageable checklist. Here is what to focus on and when.
Think of autumn as your pre-season inspection window. Before cold nights start pulling moisture out of warm indoor air, run through the hidden-spot checklist from the previous section. Clear drainage channels and weep holes so condensation has an escape route. Inspect rubber gaskets and silicone joints for separation or blackening. Check double-glazed units for failed seals — a misted or foggy appearance between panes signals blown insulation and dramatically increased mold condensation windows risk.
For wooden frames, this is the ideal time to apply an anti-fungal treatment or primer. The timber is still relatively dry from summer, so protective coatings bond properly and cure fully before damp weather arrives.
Winter is when black mould in window sills develops fastest. Daily condensation feeds colonies overnight, and by morning you are wiping puddles off the sill edge. A few habits make a significant difference:
These steps will not eliminate condensation entirely on poorly insulated frames, but they reduce the moisture load enough to slow colony growth dramatically. If a black mold window sill appears despite consistent management, it usually signals a deeper issue — failed glazing, missing thermal breaks, or inadequate ventilation — that daily wiping alone cannot overcome.
Spring is your recovery window. Warmer temperatures and longer days create ideal conditions for a thorough mould-removal treatment using the material-specific methods covered earlier. Strip out degraded silicone sealant and re-apply fresh beads while joints are dry. Knowing how to clean mold off of window sills properly at this stage prevents dormant spore colonies from roaring back the following autumn.
Summer shifts the focus entirely to prevention. Maximise natural cross-ventilation by opening windows on opposite sides of the home. Allow direct UV light to reach frame surfaces wherever possible — ultraviolet exposure inhibits spore germination and slows colony establishment on organic residues. This is also the best season for any painting or re-sealing work on wooden frames, since warm, dry conditions ensure coatings cure completely.
The full calendar looks like this:
| Season | Key Actions | Tools Needed | Time Required |
|---|---|---|---|
| Autumn | Inspect seals and gaskets; clear weep holes; check glazing units for blown seals; apply anti-fungal primer to wood frames | Pipe cleaner or thin brush, anti-fungal primer, paintbrush, torch for inspection | 1-2 hours per window |
| Winter | Daily condensation wiping; maintain humidity below 60%; keep trickle vents open; avoid indoor laundry drying near windows | Microfibre cloths, hygrometer, dehumidifier or extractor fan | 5 minutes daily; 30 minutes for dehumidifier setup |
| Spring | Full mould removal (material-specific method); replace degraded silicone; re-seal and repaint wooden frames | Cleaning solution matched to frame material, silicone sealant and gun, sandpaper, primer, paint | 2-3 hours per window |
| Summer | Maximise cross-ventilation; allow UV light onto frames; complete any painting or coating work | Window stays, UV-resistant paint or sealant if needed | Minimal — ongoing habit |
Bookmark this table or photograph it for your phone. Mold condensation windows problems are cyclical, and the homeowners who stay ahead of the cycle spend far less time — and money — dealing with recurring outbreaks than those who wait until dark patches force their hand.
Seasonal habits reduce moisture exposure considerably, but they still rely on human consistency. The most reliable long-term defence works around the clock without anyone having to remember a daily routine — and that defence starts with how air moves through the window frame itself.

Wiping condensation every morning, running seasonal inspections, scrubbing frames with the right solution for the right material — all of it helps. But every one of those actions is reactive. You are responding to moisture that has already arrived on the frame surface. The most effective long-term defence against mould on window frames works upstream of the problem, removing excess moisture from indoor air before it ever has the chance to condense.
That upstream fix is ventilation. Not a dramatic whole-house renovation — simply ensuring that stale, moisture-heavy air has a reliable exit route and fresh, drier air has a way in.
Modern homes are built tight. Improved insulation, sealed vapour barriers, draught-stripped doors, and high-performance glazing all work brilliantly for energy efficiency — but they also trap every litre of water vapour your household generates. Cooking, showering, breathing, and drying laundry can release several litres of moisture into indoor air daily. In a draughty older property, some of that moisture escapes through gaps by accident. In a well-sealed home, it stays inside and settles on the coldest surfaces it can find — your window frames.
This is exactly why building codes on both sides of the Atlantic increasingly mandate background ventilation in habitable rooms. In the UK, Approved Document F requires measurable background airflow in every living space, and trickle vents have become the standard solution in over 90% of UK homes built since 2002. Similar principles appear in US codes through ASHRAE 62.2 standards for residential ventilation. The reasoning is identical: a leaky house is not the same as a well-ventilated house, and controlled airflow prevents the condensation that fuels mould growth far more reliably than any cleaning product.
Three broad ventilation tiers are available to homeowners, each with distinct trade-offs:
Natural ventilation — opening windows
Passive background ventilation — trickle vents and frame-integrated airflow
Mechanical ventilation — extractor fans, MVHR systems
For most homes — particularly those where signs of black mold on window sills appear primarily during colder months — the sweet spot lies in combining passive background ventilation with targeted mechanical extraction in wet rooms. Extractor fans handle the intense moisture bursts from cooking and bathing, while trickle vents quietly manage the baseline humidity that accumulates in living rooms and bedrooms where no extractor exists.
Here is the common objection: "I can't leave windows open in January — it's freezing, it wastes energy, and it's a security risk." That objection is entirely valid. It is also exactly why passive background ventilation through trickle vents exists.
A trickle vent is a small, adjustable slot built into or mounted onto the window frame head. It allows a controlled trickle of fresh outdoor air to enter the room continuously, displacing stale, moisture-laden indoor air without requiring the window to be open. Modern designs direct incoming air upward toward the ceiling, where it mixes with warmer room air before circulating downward — meaning you get fresh air without feeling a cold draught at desk or bed height.
For homeowners dealing with persistent mould on wooden window frames or recurring condensation on any frame type, trickle vents address the root cause — excess indoor humidity — rather than just its visible symptom. They work around the clock without electricity, without security compromise, and without the dramatic heat loss that comes from cracking a window in winter.
One example of this approach is Shengxin Aluminium's Fresh Air Trickle Vent, a frame-integrated passive ventilation unit designed for moisture-prone rooms. Its design enables continuous fresh-air exchange while maintaining the thermal efficiency of the window assembly — a balance that matters enormously in homes where black mold on windows keeps returning despite regular cleaning. Because it integrates directly into the frame profile, it avoids the bulky, bolt-on appearance of older vent designs and preserves the clean sightlines homeowners expect from modern aluminium windows.
Trickle vents are not the only answer. In highly airtight homes or buildings with exceptionally high moisture loads — think multi-occupancy flats, homes with indoor pools, or properties in particularly humid climates — a full mechanical ventilation system with heat recovery (MVHR) may be necessary. For the majority of homes experiencing seasonal condensation-driven mould, however, passive background ventilation provides a remarkably effective and low-cost intervention. The key is ensuring the vent's equivalent area (airflow capacity) matches the room size and usage profile, and that vents remain open and unobstructed year-round.
The most effective mould prevention happens before condensation ever forms — continuous passive ventilation removes excess moisture at the source.
If you have ever wondered whether mold can grow on glass, the answer is yes — but only when a film of organic dust and persistent moisture sits on the surface. Remove the moisture through consistent ventilation, and even glass stays clear. The same principle applies to every frame material. Ventilation does not just reduce mould risk; it eliminates the environmental condition — sustained surface dampness — that makes mould possible in the first place.
Knowing how to clean mould off window sills is a necessary skill, and the seasonal habits from the previous section keep things manageable. But ventilation is the strategy that breaks the cycle permanently. It shifts you from fighting mould after it appears to preventing the conditions it needs to exist. The remaining question is not about cleaning or prevention — it is about recognising when the problem has moved beyond what any DIY approach can safely handle.
Ventilation, seasonal maintenance, and material-matched cleaning handle the vast majority of mould problems on window frames. But not all of them. Some situations cross a line where DIY methods become ineffective, unsafe, or both — and recognising that threshold early saves you time, money, and potential health consequences.
How do you know your situation is still manageable at home? Four criteria should all be true before you proceed with a DIY approach:
If all four boxes check out, the material-specific methods and matched solutions covered in this guide will serve you well. Most cases of brown spots on a window sill or light surface growth on uPVC fall comfortably within this safe range.
Certain red flags mean the problem has moved beyond what a spray bottle and a microfibre cloth can resolve. Call a qualified mould remediation specialist if you encounter any of the following:
A professional assessment typically begins with a visual survey, moisture-meter readings across the frame and surrounding wall, and — where warranted — air sampling to identify spore types and concentrations. Remediation itself follows containment protocols to prevent spore spread, addresses the moisture source rather than just the visible growth, and verifies clearance through post-remediation testing. Expect the process to take anywhere from a single day for a localised window problem to several days if wall cavities are involved.
Wood windows turning black along the lower rail or sill corners are one of the most common triggers for professional calls. That blackening often represents years of condensation damage compounded by mould penetration deep into end grain — a situation where sanding and re-priming cannot reach the root of the problem and partial timber replacement becomes the practical path forward.
Moldy windows are not inevitable. Effective management combines every layer this guide has covered: correctly identifying what is growing, understanding the condensation physics driving it, cleaning with the right solution for your frame material, inspecting the hidden spots that re-seed visible surfaces, following a seasonal maintenance calendar, and — most critically — fixing the ventilation and insulation deficiencies that create the damp conditions mould depends on. Solutions like frame-integrated trickle vents, including options such as Shengxin Aluminium's Fresh Air Trickle Vent, work alongside glazing upgrades and humidity management to form a comprehensive long-term prevention strategy. Fix the environment, and you fix the mould — not for a week, but for good.
Mould returns because the underlying cause — condensation — has not been addressed. When warm, humid indoor air contacts a window frame surface that sits at or below the dew-point temperature, water droplets form and create a persistently damp zone. Common culprits include inadequate ventilation, single or failed double glazing, missing thermal breaks on metal frames, high indoor humidity from cooking or drying laundry, and gaps in frame-to-wall insulation. Until you raise the frame's surface temperature above the dew point or reduce indoor humidity through ventilation solutions such as trickle vents or extractor fans, the moisture cycle will continue feeding new mould colonies no matter how thoroughly you clean.
Mildew appears as a white, grey, or yellowish powdery film that sits on the surface and wipes away easily. Mould is typically green, black, or dark brown with a fuzzy or slimy texture, and it sends root-like hyphae deep into porous materials like wood. A simple swab test helps confirm which you have: dab diluted bleach (1:10 ratio) onto the patch and wait a few minutes. Mildew lightens or disappears quickly, while embedded mould stays dark. Both need treatment, but mould demands material-specific cleaning methods and often points to a more serious moisture problem behind the frame.
It depends entirely on the frame material. Diluted bleach works on uPVC and vinyl for surface-level mould, but it should never be used on wood or aluminium. On wood, bleach destroys cellulose fibres, raises the grain, and leaves a weakened surface that absorbs moisture faster — actually accelerating future outbreaks. On aluminium, sodium hypochlorite pits anodised and powder-coated finishes, causing irreversible discolouration. Safer alternatives for most frame types include white vinegar and 3% hydrogen peroxide, both of which kill mould effectively without damaging the underlying material.
Winter prevention centres on reducing moisture contact with cold frame surfaces. Wipe condensation from sills each morning, keep indoor humidity below 60% using extractor fans or a dehumidifier, leave trickle vents open for continuous background airflow, and avoid drying laundry on radiators near windows. Frame-integrated passive ventilation solutions — such as Shengxin Aluminium's Fresh Air Trickle Vent — provide 24/7 air exchange without opening windows, removing excess moisture at the source while maintaining thermal efficiency and home security throughout the heating season.
Seek professional remediation when the affected area exceeds roughly 3 square feet per window, mould has penetrated deep into wood substrate or the wall cavity behind the frame, black mould returns within weeks of thorough cleaning, occupants experience persistent respiratory symptoms, or growth is discovered between the wall framing and the window unit. A professional assessment typically involves moisture-meter readings, visual inspection of concealed areas, and sometimes air sampling. DIY cleaning is appropriate only when mould is surface-level, covers a small area, and no household members have compromised respiratory health.



 Інтернет-сервіс
 0086 136 3563 2360
 sales@sxalu.com
 +86 136 3563 2360
 Українська
 English
 français
 Deutsch
 русский
 español
 português
 العربية
 ไทย
 Việt