Imagine you have bought a trickle vent kit, watched a fitting video, and picked up your router — only to discover halfway through the cut that your frame is too shallow or there is a steel bar exactly where the slot needs to go. That is a permanently damaged window and money wasted. Before you spend a penny or touch a tool, a quick pre-assessment of your uPVC windows will tell you whether a DIY trickle vent installation is realistic or whether you should call a professional instead.
This three-part check takes less than ten minutes and can save you from an irreversible mistake. Every step matters equally, so work through all three before making any purchasing decisions.
The first thing you need to confirm is whether your window frame has enough material to accept a routed ventilation slot. Most trickle vents require a minimum frame depth of around 24 mm to sit securely without breaching the outer wall of the profile. Anything shallower, and you risk cutting right through the frame — a disaster you cannot undo.
Here is how to check uPVC window frame depth for trickle vents accurately. Open the window sash and look at the top rail of the outer frame (the fixed part attached to the wall). Using a tape measure or digital callipers, measure from the inside face of the frame to the glazing bead — the strip that holds the glass unit in place. This measurement represents the usable material available for routing. If it falls below 24 mm, a standard slot vent is unlikely to fit safely.
You will also want to identify your profile type. uPVC frames come in two common styles: chamfered (angular, bevelled edges) and sculptured (rounded, decorative edges). The distinction matters because the slot position and the vent model differ between them. A vent designed for a chamfered profile will not sit flush on a sculptured one, and vice versa. Check the vent manufacturer's specifications to confirm compatibility with your profile shape before ordering.
Here is something most fitting guides skip entirely: many uPVC window frames contain galvanised steel reinforcement bars hidden inside the profile chambers. These bars add rigidity and improve burglary resistance and structural stability, but they also present a serious obstacle when you are trying to route a ventilation slot.
Can you fit trickle vents to any uPVC window that has steel inside? Yes — but only if you plan for it. Standard plastic-cutting or wood-cutting drill bits will overheat and snap the moment they hit steel. You will need HSS (High-Speed Steel) bits or HSS-tipped router cutters to get through the reinforcement cleanly.
The uPVC window steel reinforcement magnet test is the simplest way to map what is inside your frame. Grab a strong magnet — a neodymium magnet works best — and slowly run it along the full length of the frame head where you intend to cut the slot. If the magnet grips firmly at any point, steel reinforcement sits directly beneath that section. If it slides freely with no pull, that area is unreinforced plastic only. Mark any steel zones with a pencil so you know exactly what you are dealing with before routing begins.
Should the magnet reveal steel running across the entire intended slot area, you have two options: reposition the vent laterally to avoid the reinforcement, or commit to HSS tooling for the full cut. Either way, knowing in advance prevents a nasty mid-project surprise.
The final pre-assessment step is often the most overlooked. Your uPVC window frame is not empty space — it houses locking mechanisms, espagnolette bars, and hinge-side hardware, all of which occupy specific zones along the frame head and sides. Routing a slot through any of these components will destroy the window's locking function and compromise security.
Open and close the window slowly while watching the top rail from the inside. Note where the locking cams or mushroom pins engage with the frame keeps. Check whether the espagnolette bar (the central locking rod) extends into the head section. On the hinge side, verify that no hardware brackets sit within your planned slot area. If any mechanism overlaps with the vent position, shift the template until you find a clear zone.
Before picking up any tools, make sure all three of these critical checks pass:
Failing even one of these checks does not necessarily mean you cannot have trickle vents fitted — it means the job is beyond straightforward DIY territory. A professional window installer has the experience and specialist equipment to handle shallow frames, heavy steel reinforcement, or tight hardware clearances without compromising the frame's integrity or your home's security.
With your windows assessed and confirmed as suitable, the next question is whether you are actually required to fit trickle vents — or simply choosing to. The answer depends on building regulations that many homeowners misunderstand.
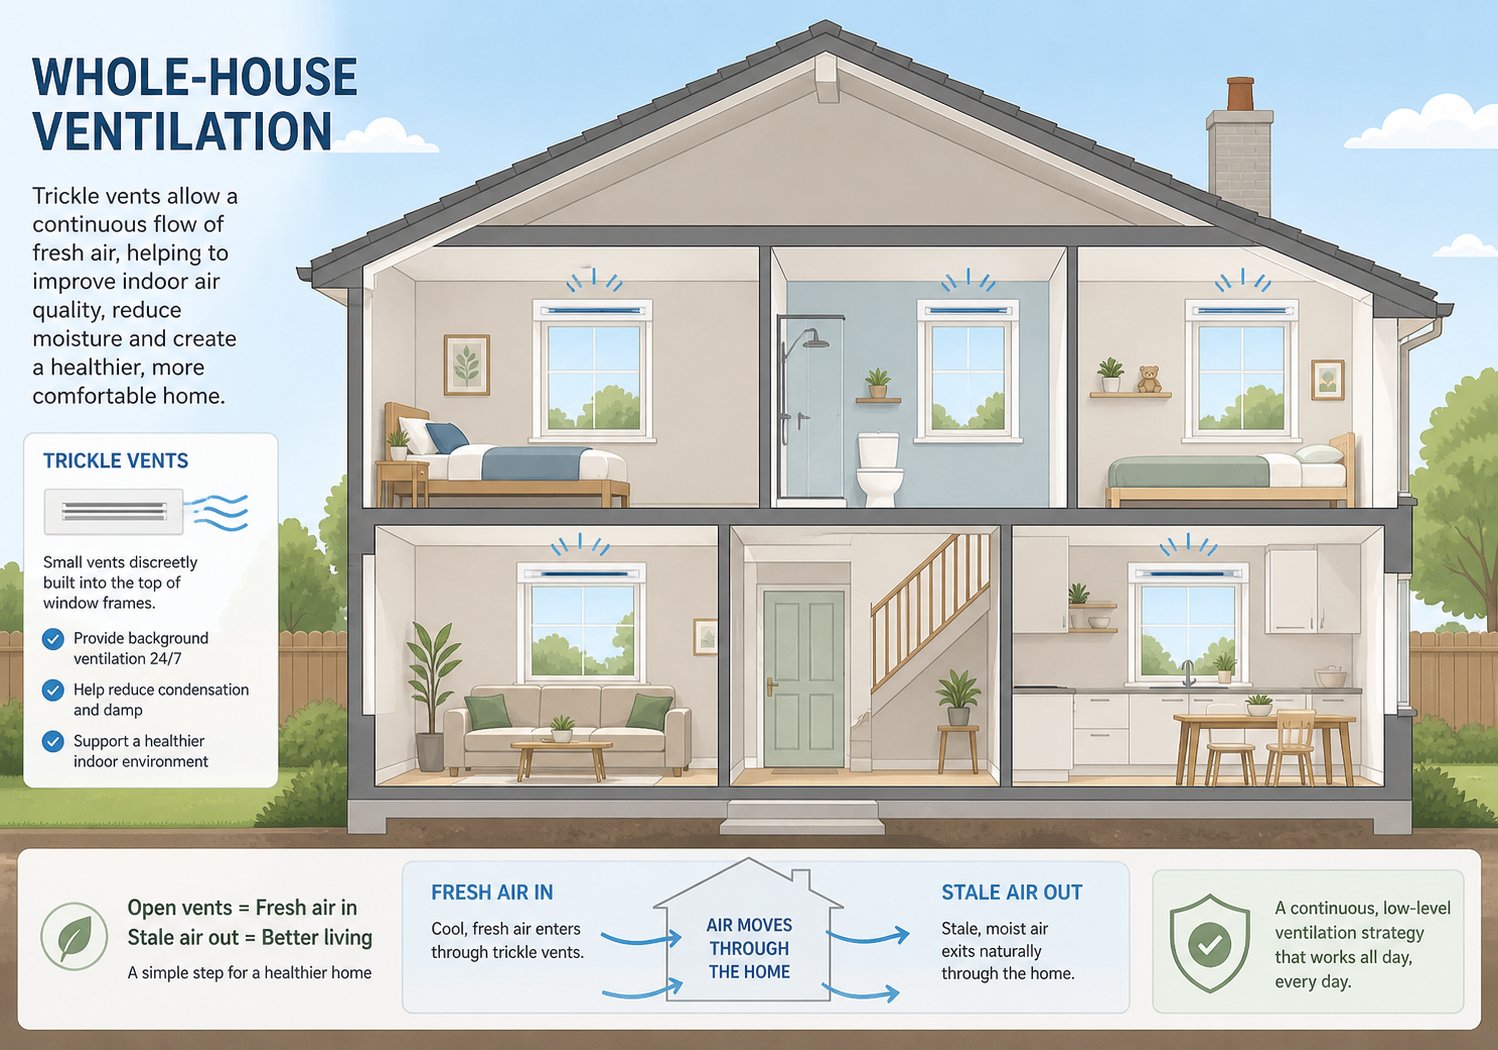
Are trickle vents a legal requirement for replacement windows, or just a recommendation? This is one of the most common questions homeowners ask — and the answer is more nuanced than a simple yes or no. It depends on what type of work you are doing, when you are doing it, and which part of the UK you live in.
The regulation you need to understand is Approved Document F of the Building Regulations, which covers ventilation in dwellings. Think of it as the government's rulebook for ensuring homes can breathe properly. Scotland follows its own standard under Section 3.14 of the Domestic Technical Handbook, while Northern Ireland applies Part K of its Building Regulations. The principles are broadly similar across all regions: homes need a minimum level of background ventilation to prevent condensation, mould, and poor indoor air quality.
The Approved Document F trickle vent requirements explained in plain terms come down to three distinct scenarios:
1. New-build properties. Every new dwelling must include background ventilation that meets specific equivalent area thresholds. Habitable rooms such as bedrooms and living rooms require a minimum of 8,000 mm² equivalent area per room, while wet rooms like kitchens and bathrooms need 4,000 mm² plus mechanical extract ventilation. Trickle vents are the most common way builders satisfy this requirement.
2. Replacement windows under a competent person scheme. This is where most homeowners encounter the regulation. If you are replacing windows through a FENSA or Certass registered installer — or via local authority building control — the new windows must replicate or improve upon the ventilation provision of the ones they replace. Since 15 June 2022 in England and 23 November 2022 in Wales, this effectively means trickle vents are required on the vast majority of replacement windows. Do you need trickle vents when replacing uPVC windows? In almost every case, yes. Your installer carries this compliance duty and cannot waive it at a customer's request.
3. Existing windows with no replacement planned. If you are keeping your current windows and simply want to improve ventilation — perhaps to tackle condensation or mould — there is no legal obligation to retrofit trickle vents. However, doing so voluntarily is one of the most effective and affordable ways to introduce controlled background airflow without opening windows.
Understanding FENSA trickle vent building regulations in the UK matters even if you are fitting vents yourself. A non-compliant installation can invalidate your FENSA certificate, create problems during a property sale, and leave you exposed to building control enforcement action.
Here is a detail that catches many DIYers off guard. When trickle vents are installed in new-build or factory-ordered windows, the slots are precision-routed during manufacturing using CNC machinery. Every cut is perfectly straight, perfectly positioned, and made under controlled conditions before the frame ever reaches a building site.
Retrofit fitting is a fundamentally different process. You are routing into an existing, installed frame — on site, often at height, with no factory jig to guide the cut. The margin for error is tighter, and the consequences of a mistake are more severe because the frame is already glazed and sealed into the building. This is exactly why the assessment steps covered earlier matter so much: confirming frame depth, mapping steel reinforcement, and checking hardware clearance are your substitute for the precision a factory environment provides.
If your existing windows had no trickle vents and you are replacing them like-for-like under building control, the new windows must include trickle vents or an approved equivalent ventilation strategy — there is no opt-out.
Knowing whether you are legally required to fit vents — or choosing to for practical reasons — shapes every decision that follows, starting with selecting the correct vent size for each room in your home.
Picking a trickle vent off the shelf because it "looks about right" is one of the most common mistakes homeowners make. A vent that physically fits your frame but delivers inadequate airflow will leave you with the same condensation problem you started with — and a permanent slot in your window to show for it. Conversely, a vent with the correct ventilation capacity but the wrong slot length simply will not fit. Size selection involves two separate decisions: the ventilation performance the vent delivers and the physical dimensions it requires.
Getting both right before you cut anything is non-negotiable.
Every trickle vent has a performance specification called its equivalent area, or EA, measured in mm². Sounds technical? It is actually straightforward once you strip away the jargon. EA represents the effective open area through which air can actually flow — not the physical size of the slot, but the aerodynamic opening after accounting for internal baffles, grilles, and resistance within the vent body. A vent with a 2,500 mm² physical slot might only deliver around 2,000 mm² of equivalent area because its internal design slows the air slightly.
Why does this matter? Because building regulations set their requirements in equivalent area, not physical dimensions. If you match based on slot size alone and ignore the EA rating on the manufacturer's specification sheet, you could end up with a compliant-looking installation that actually falls short of the required airflow.
The two most common residential EA ratings you will encounter are 2,500 mm² and 5,000 mm². So what is the 2500 vs 5000 EA trickle vent difference in practical terms? A 2,500 mm² vent provides roughly half the effective airflow of a 5,000 mm² unit. That makes the smaller vent suitable as a single contributor in a room served by multiple windows, while the larger vent can do more of the heavy lifting on its own — particularly useful in rooms with only one or two window openings.
Under Approved Document F (2022), the minimum equivalent area requirements break down by room type:
What size trickle vent do you need for a bedroom? A single vent will not usually cover it alone. An 8,000 mm² room requirement typically means fitting two vents rated at 4,000 mm² EA each, or three to four smaller 2,500 mm² units spread across the windows in that room. You can distribute the total EA across every window in a single room — a bay window with three panes, for example, could carry one vent per pane, with their combined EA meeting or exceeding the 8,000 mm² target.
Here is a practical example. Imagine a standard two-storey, three-bedroom house. Each bedroom needs 8,000 mm² of background ventilation. If every bedroom has two windows, you could fit a single 4,000 mm² vent on each window to reach the required total. The living room follows the same rule. The kitchen, however, only needs 4,000 mm² from trickle vents because the extractor fan handles rapid moisture removal — so a single well-rated vent on one kitchen window may be sufficient.
Always check the manufacturer's stated equivalent area on the product specification — never assume EA from the physical slot size alone, because internal baffle designs vary significantly between products.
With your EA target established, the next question is purely physical: will the vent fit the slot your frame can accommodate? Most trickle vents designed for uPVC windows require a routed slot that is typically 400 mm or 412 mm long, cut into the head of the frame. This is the trickle vent slot length for uPVC windows you will see referenced in nearly every installation template, and it has become the de facto industry standard for retrofit and fabricator-fitted vents alike.
Shorter vents — around 250 mm to 300 mm — exist for narrower frames, but they deliver lower EA values and may require fitting multiple units side by side to hit your room's ventilation target. Longer slots offer higher airflow capacity from a single vent, but your frame width must accommodate them with clearance from locking hardware and hinge brackets on either side.
Before purchasing, measure the available unobstructed width across the top rail of your frame (your hardware clearance check from the assessment stage). Subtract at least 20 mm from each end to allow for fixings and edge clearance, and the remaining length is your maximum slot size.
The table below compares common vent options by slot length, equivalent area, and the room types they best serve. Use it alongside your room-by-room EA calculation to select the right product for each window.
| Vent Option | Slot Length | Equivalent Area (EA) | Best Suited For | Key Advantage |
|---|---|---|---|---|
| Shengxin uPVC Window Trickle Vent | 400 mm (standard slot) | 2,500 - 5,000 mm² | Bedrooms, living rooms, kitchens, bathrooms | Fits both aluminium and uPVC frames; low-maintenance design with snap-fit internal canopy |
| Standard slot vent (typical) | 400 - 412 mm | 2,500 - 4,000 mm² | Most habitable rooms (paired for higher EA) | Widely available; compatible with most frame profiles |
| Compact slot vent | 250 - 300 mm | 1,500 - 2,500 mm² | Narrow frames, WC windows, secondary vents | Fits restricted spaces where a full-length vent cannot |
| Extended linear vent | 525 mm+ | 4,000 - 8,000 mm² | Large living rooms, conservatories | Higher EA from a single unit; fewer installations needed |
| Acoustic slot vent | 400 - 412 mm | 2,000 - 4,500 mm² | Rooms facing busy roads or railways | Sound-attenuating baffle (32 - 46 dB reduction) |
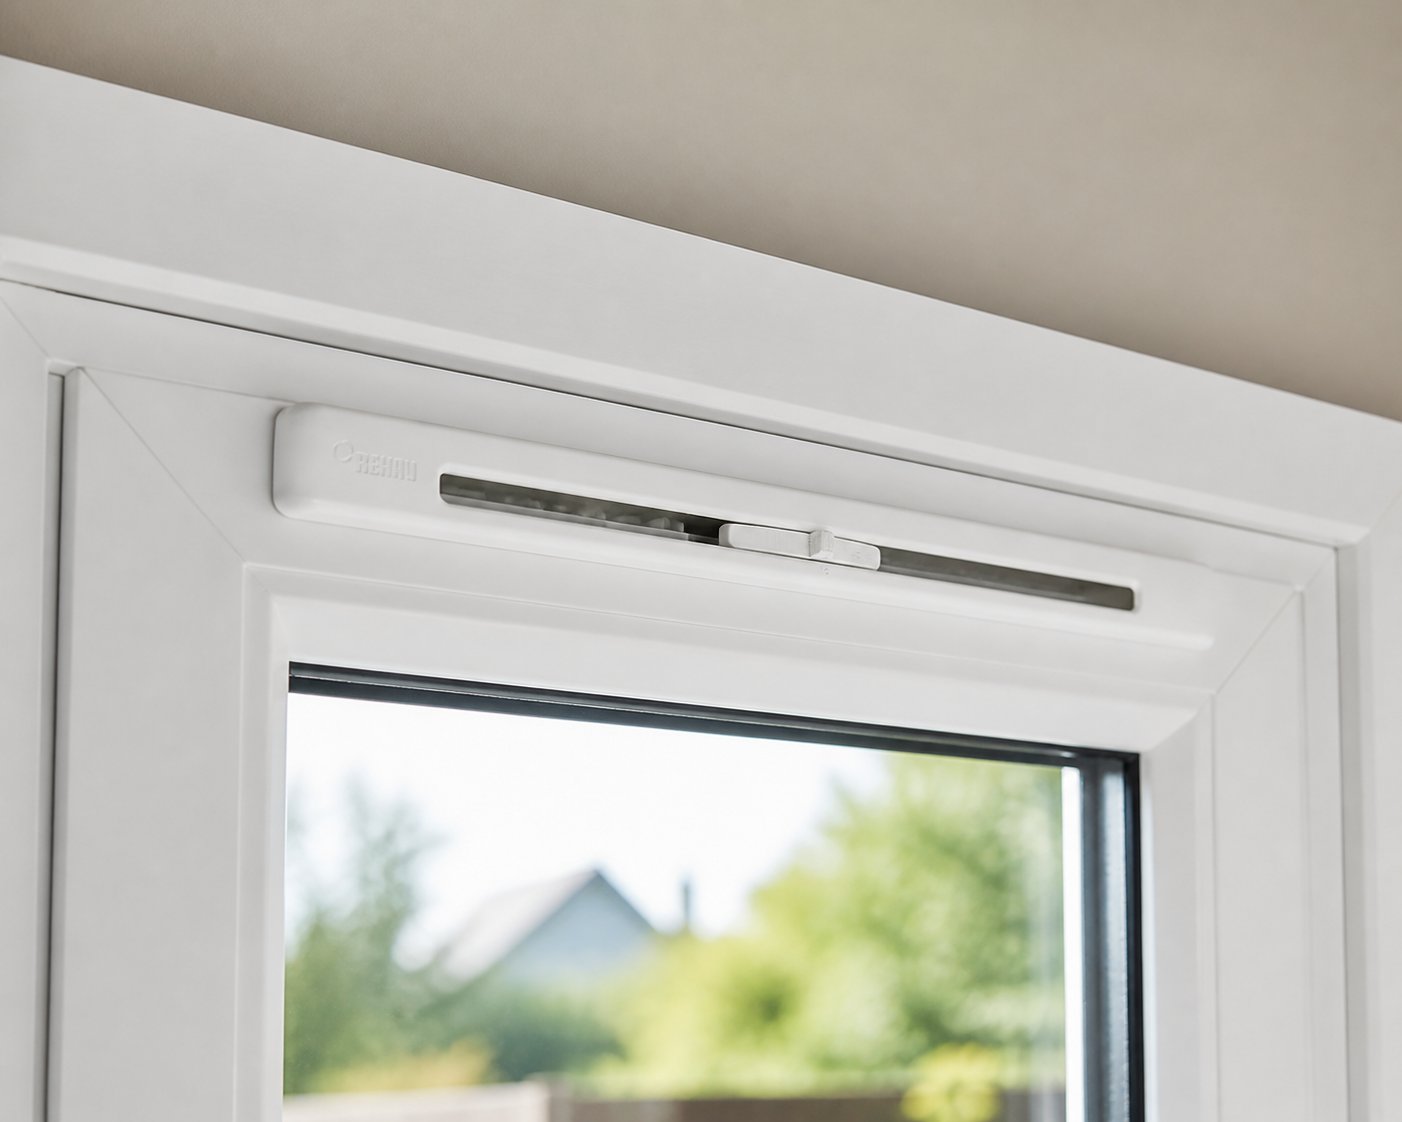
A few things stand out from that comparison. If you are working across a mixed project — fitting vents to both aluminium and uPVC frames in the same property, or switching between frame types on different jobs — compatibility becomes a genuine time and cost saver. The Shengxin uPVC Window Trickle Vent is worth evaluating here because it integrates with both frame systems using common routed slot dimensions, which means one product covers multiple scenarios without needing separate vent models for each frame material.
Beyond frame compatibility, prioritise vents that include a fitting template and pre-measured fixings in the kit. A template eliminates guesswork during the marking stage, and matched screws prevent the overtightening issues that crack uPVC frames. Low-maintenance designs — vents with smooth internal channels and simple slider mechanisms — also reduce long-term upkeep, since complex internal geometries tend to trap dust and debris over time.
With your vent size chosen and the product ordered, the hands-on work begins. The quality of your installation depends heavily on having the right tools ready before you make a single mark on the frame — and knowing exactly why each tool matters.
What tools do you need to fit trickle vents properly? Most guides hand you a bullet-point shopping list and move on. That approach leaves you standing in a hardware store wondering why three different router bits exist, whether a multi-tool will do the job, or if you even need a router at all. Each tool in this checklist serves a specific purpose during the fitting process, and understanding that purpose helps you decide what to buy, what to borrow, and where a cheaper alternative will work just as well.
Gather everything before you mark a single line on the frame. Stopping mid-project to hunt for a missing bit or an alternative cutting tool breaks your focus — and on a job where one misplaced cut ruins an entire window frame, focus is everything.
The centrepiece of this project is the tool that cuts the ventilation slot. You have three realistic options, and the one you choose affects both the quality of the finished result and the difficulty of the job.
Option 1 — Plunge router with a 16 mm straight-flute cutter (preferred). A plunge router is the best tool for this task because it produces a precise, straight slot with clean, smooth edges. That precision matters: smooth slot walls allow the vent canopy to sit flush against the frame, which improves both the seal and the appearance. Set the cutting depth to match the frame wall thickness — typically 2 to 3 mm of uPVC — and the router does the rest in a single controlled pass. A straight-flute cutter in 16 mm width matches the slot width most trickle vent templates specify. If you already own a plunge router, you are in the strongest position for a clean result.
Option 2 — Oscillating multi-tool with a flat cutting blade (accessible alternative). Can you use a multi-tool to fit trickle vents? Absolutely. A multi-tool is slower and requires more care to keep the cut straight, but it is far more affordable and already lives in many DIY toolboxes. Use a flat plunge-cut blade designed for plastics or wood, and make multiple shallow passes rather than trying to cut full depth in one go. Clamping a metal straight-edge along the slot line helps keep the blade from wandering — without a guide, freehand cuts in uPVC tend to drift.
Option 3 — Jigsaw (last resort). A jigsaw can cut the slot if neither a router nor multi-tool is available, but expect a rougher finish. The reciprocating blade tends to leave ragged edges on uPVC, and keeping a perfectly straight line over 400 mm is difficult without a fence. You will spend more time filing and cleaning the slot edges afterwards.
Why is a router preferred over the alternatives? It comes down to edge quality. A plunge router, with its controlled plunge depth and rigid base plate, produces factory-straight cuts that rival CNC-routed slots. That edge quality translates directly into how well the vent gasket seals, how flush the canopy sits, and how professional the finished installation looks. If you plan to fit vents to several windows, renting a plunge router for a day is worth the modest cost.
Beyond the cutting tool, you will need a power drill with two types of bit. Standard 5 mm bits designed for plastic or wood handle the pilot holes and screw-fixing holes through unreinforced sections of the frame. If your magnet test from the assessment stage revealed steel reinforcement in the routing path, add a set of HSS (High-Speed Steel) drill bits — the best router bit for cutting a uPVC trickle vent slot through reinforced frames is always an HSS-tipped cutter, since standard bits overheat and snap on contact with galvanised steel.
Precision marking and clean finishing are what separate a professional-looking result from a botched one. These items are inexpensive, but skipping any of them introduces avoidable errors or cosmetic problems.
A quick note on what should already be in the box when your vent kit arrives. Check the trickle vent fitting kit contents checklist before your installation day: a cardboard or plastic routing template, the internal canopy, the external rain deflector, a gasket or foam seal strip, and pre-measured fixings. If any of these are missing, contact the supplier before you start — improvising a template or substituting screws invites problems that are easy to avoid.
Routing uPVC is not a high-risk task, but it does produce hazards that catch people off guard.
With every tool, supply, and safety item accounted for, you are ready for the most critical accuracy step in the entire process: positioning the template and marking the slot. A few minutes of careful measurement here determines whether the vent sits perfectly or permanently reminds you of a rushed start.
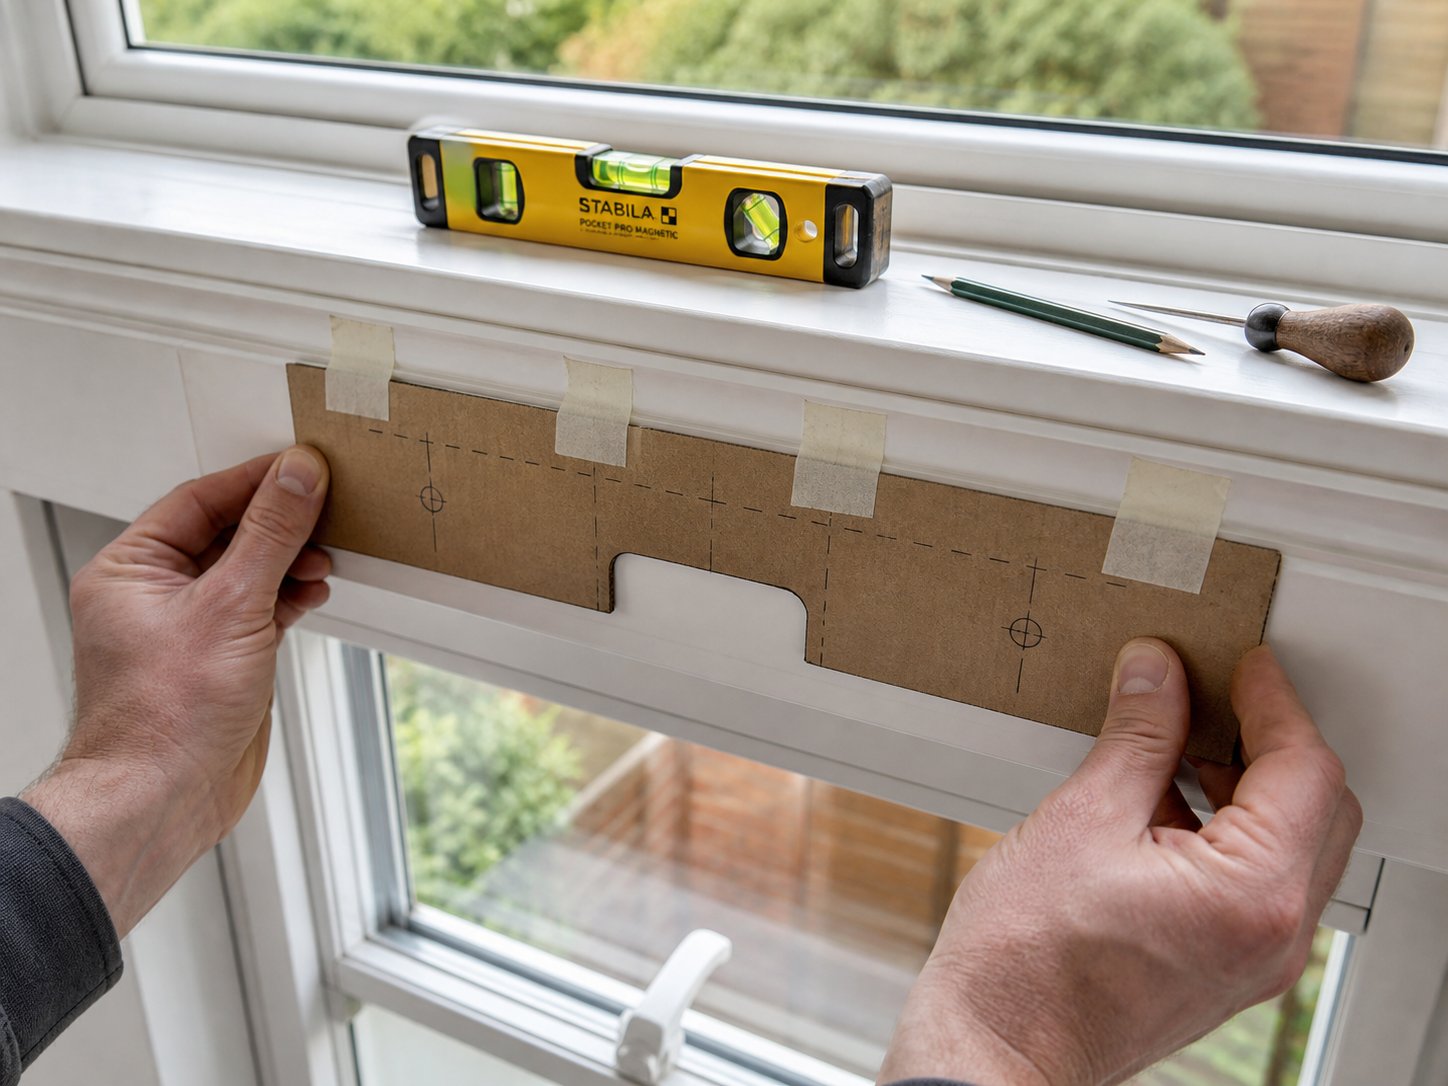
This is the step that separates a clean, professional installation from a permanent mistake. Once a ventilation slot is routed into uPVC, there is no patching it, filling it, or shifting it a few millimetres to the left. The frame is permanently altered. Every minute you spend on accurate marking and templating here saves you from the only fix for a misplaced slot — replacing the entire frame.
If you have your tools laid out and your vent kit unpacked, resist the urge to power up the router. The cutting stage can wait. Right now, your only job is precision.
Start from the inside of the window. You are working on the head — the horizontal top rail of the outer frame, not the opening sash. This is where to position the trickle vent template on the window in almost every standard residential installation, because the head provides the longest uninterrupted run of frame material and sits above the glazing line where the slot will not compromise the sealed unit or the weatherseal beneath it.
Take the cardboard or plastic template supplied with your vent kit and hold it against the inside face of the frame head. Centre it across the full width of the frame so the slot will sit symmetrically. Eyeballing this is not good enough — measure the total frame width, divide by two, and mark the centre point with a pencil. Align the template's centre mark to that point.
Positioning matters vertically as well as horizontally. The template should sit so the routed slot passes through the frame's front wall but does not breach the glazing rebate (the channel where the glass unit sits) or cut into the outer weatherseal. If you are unsure, hold the template up and peer at the frame from the side — you should see clear material between the bottom edge of the proposed slot and the top of the glazing bead.
Here is how to use a trickle vent template correctly, step by step:
Once all marks are transferred, peel the template away carefully and inspect your work. You should see a clean rectangular outline with dimpled screw positions at precise intervals. If any mark is unclear or ambiguous, re-tape the template and redo it. Guessing the position of a single screw hole during drilling is how frames crack.
Most trickle vents use a two-part design — an internal canopy that controls airflow and an external rain deflector that prevents water ingress. Both components mount on opposite faces of the same frame section, and they must align perfectly. A misaligned external deflector blocks part of the routed slot from one side, restricting airflow and creating a potential water trap.
The simplest and most reliable method for transferring your internal markings to the outside face is to drill reference pilot holes from the inside. Here is the trickle vent internal and external alignment guide that ensures both sides match:
This pilot-hole transfer method is how to mark the trickle vent slot position on a uPVC frame without any measurement drift between inside and outside. Relying on tape-measure dimensions alone — measuring "120 mm from the left edge" on both sides independently — introduces the risk of cumulative error, especially on frames that are not perfectly square.
Before you move on, stand back and verify your marks from both sides. Walk inside, check the internal outline. Walk outside, check the external outline. Compare them mentally. Do the slot positions occupy the same zone of the frame head? Are both templates level? Do the screw-hole positions fall on solid uPVC rather than on the routed slot area?
Measure twice, route once — there is no fixing a misplaced slot in uPVC without replacing the frame.
Double-checking alignment before any routing begins is the single most important discipline in the entire fitting process. The few minutes it takes to walk around the window, re-examine your marks, and confirm everything lines up will feel tedious in the moment — and completely justified the instant the router touches the frame.
With both sides marked and verified, the frame is ready for the cut. The routing stage demands a different kind of precision: controlled speed, correct depth, and a plan for what happens if your cutter hits steel reinforcement mid-slot.
Your marks are on the frame, your templates are verified from both sides, and the router is ready. This is the point of no return. Every millimetre of material you remove is permanent, and the quality of this cut determines whether your trickle vent sits flush, seals properly, and performs as intended — or whether you are left with a ragged slot, a cracked frame, or a vent that rattles in the wind.
Routing uPVC is not difficult in principle, but it punishes impatience. The material behaves differently from wood: push too fast and the friction generates enough heat to melt the plastic, which clogs the cutter and leaves a lumpy, uneven channel. Go too slow and the bit dwells in one spot, scorching the surface. The sweet spot is a steady, deliberate feed rate — consistent pressure, no pauses, no rushing.
Here is how to route a trickle vent slot in uPVC cleanly, safely, and without ruining the frame.
Start from the inside of the window. Set your plunge router depth to match the front wall thickness of the uPVC profile — typically 2 to 3 mm. You are cutting through the inner skin of the frame only at this stage, not plunging all the way through to the outside. If you are unsure of the exact wall thickness, examine the frame cross-section where the glazing bead clips in. That exposed edge reveals the wall depth precisely.
Getting the router depth setting for a uPVC trickle vent slot right is critical. Too shallow and you will not break through the inner wall — you will need to make additional passes or risk uneven material removal. Too deep and the cutter plunges into the hollow chambers of the frame or, worse, punches through the outer skin in a spot you did not intend to open up.
Before powering on, clamp a metal straight-edge guide parallel to your marked slot line. The straight-edge acts as a fence for the router base plate to ride against, and it is the single most effective way to ensure you cut a perfectly straight slot across the full 400 mm length. Without a guide, even experienced users find the router drifting slightly — and "slightly" is enough to prevent the vent canopy from seating properly.
Ready? Here is the cutting sequence:
If you are using an oscillating multi-tool instead of a router, the approach changes. A multi-tool lacks the rigid base plate and depth stop of a plunge router, so you need to compensate with multiple shallow passes. Score the slot outline first with a light initial cut, then gradually deepen it with each subsequent pass. Keeping the blade pressed against a clamped straight-edge is even more important here — freehand multi-tool cuts in uPVC tend to wander and produce wavy edges. Expect the process to take three to four times longer than routing, but the end result can be perfectly acceptable with patience.
One more thing: uPVC swarf — the fine curls and chips of plastic the cutter throws off — tends to stick to the slot edges because friction generates static. Brush or vacuum the slot clear after each pass so the debris does not interfere with subsequent cuts or give you a false reading on depth.
Remember the magnet test from your pre-assessment? This is where it pays off. If your magnet detected steel reinforcement in the routing path, you will know the moment the cutter reaches it. The resistance increases sharply, the motor note climbs, and the smooth feed suddenly feels like you are trying to push through a wall. That abrupt change is your cue to stop, reassess, and switch tooling.
Cutting through steel reinforcement in a uPVC window frame is entirely possible — but only with the right bit. A standard plastic-cutting or wood-cutting router bit is not hardened enough for galvanised steel. Force it, and one of two things happens: the bit overheats and loses its edge within seconds, or it snaps at the shank, sending a broken fragment into the frame cavity. Neither outcome is recoverable mid-cut.
Switch to an HSS (High-Speed Steel) cutter or an HSS-tipped router bit. These are designed to handle ferrous metals and will cut through a standard window reinforcement bar without excessive heat buildup. Feed even more slowly than you did through the uPVC alone — steel removes material in fine chips rather than curls, and the cutter needs time to clear each chip before the next tooth engages.
A few practical realities to prepare for:
What if steel completely blocks the slot path? If the reinforcement bar is wider than your slot or too thick to cut through cleanly, repositioning the vent 20 to 30 mm to one side is the safest solution. Shift the template laterally, re-mark, re-drill your pilot holes, and route in the adjusted position. In extreme cases — where the bar spans the entire frame head — a shorter vent or a pair of smaller vents positioned on either side of the reinforcement may be the only viable option. This is worth checking before you begin routing rather than discovering mid-cut that the steel is impassable.
With the internal slot complete, move to the outside of the window. Locate the pilot holes you drilled during the marking stage — they define the exact start and end points of the external slot. Align your straight-edge guide with these reference points, clamp it in place, and repeat the routing process on the outer face of the frame.
The technique is identical: set the correct plunge depth for the outer wall thickness, feed steadily along the guide, and listen to the motor for signs of excessive speed or resistance. Working from a ladder or at height adds a complication — you need stable footing and both hands on the router at all times. If the window is above ground-floor level, consider using a scaffold tower rather than a ladder. A router requires two-handed control, and you cannot safely hold a ladder with one hand while routing with the other.
Once both internal and external slots are cut, the two channels should meet in the middle, creating an unobstructed through-slot from one face of the frame to the other. Hold a torch on one side and check for light passing through from the other. If light is partially blocked, a thin web of uPVC or a section of steel reinforcement remains in the centre — clear it by passing a long drill bit or flat file through the slot until the obstruction is removed.
Finishing the slot properly is just as important as cutting it. Rough edges prevent the vent gasket from sealing, trap moisture, and make the canopy sit unevenly. Run a deburring tool along every cut edge — inside and outside — to remove burrs and sharp fibres. If you do not have a deburring tool, fine sandpaper (120 to 180 grit) wrapped around a flat block achieves the same result in a few passes.
Finally, vacuum out all plastic and metal swarf from inside the frame cavity. Use a narrow nozzle attachment or a blast of compressed air directed through the slot. Debris left behind can block airflow, rattle inside hollow chambers, or work its way into the vent mechanism after installation.
To keep the full sequence clear, here is a summary of every sub-step in order:
Inspect the finished slot from both sides. It should be clean, straight, and completely clear from inside to outside — a neat rectangular channel ready to accept the vent assembly. If the edges look smooth, the slot dimensions match your template, and no debris remains in the frame, the hardest part of the job is behind you. What comes next is far more forgiving: fitting the vent components into the slot you have just prepared.
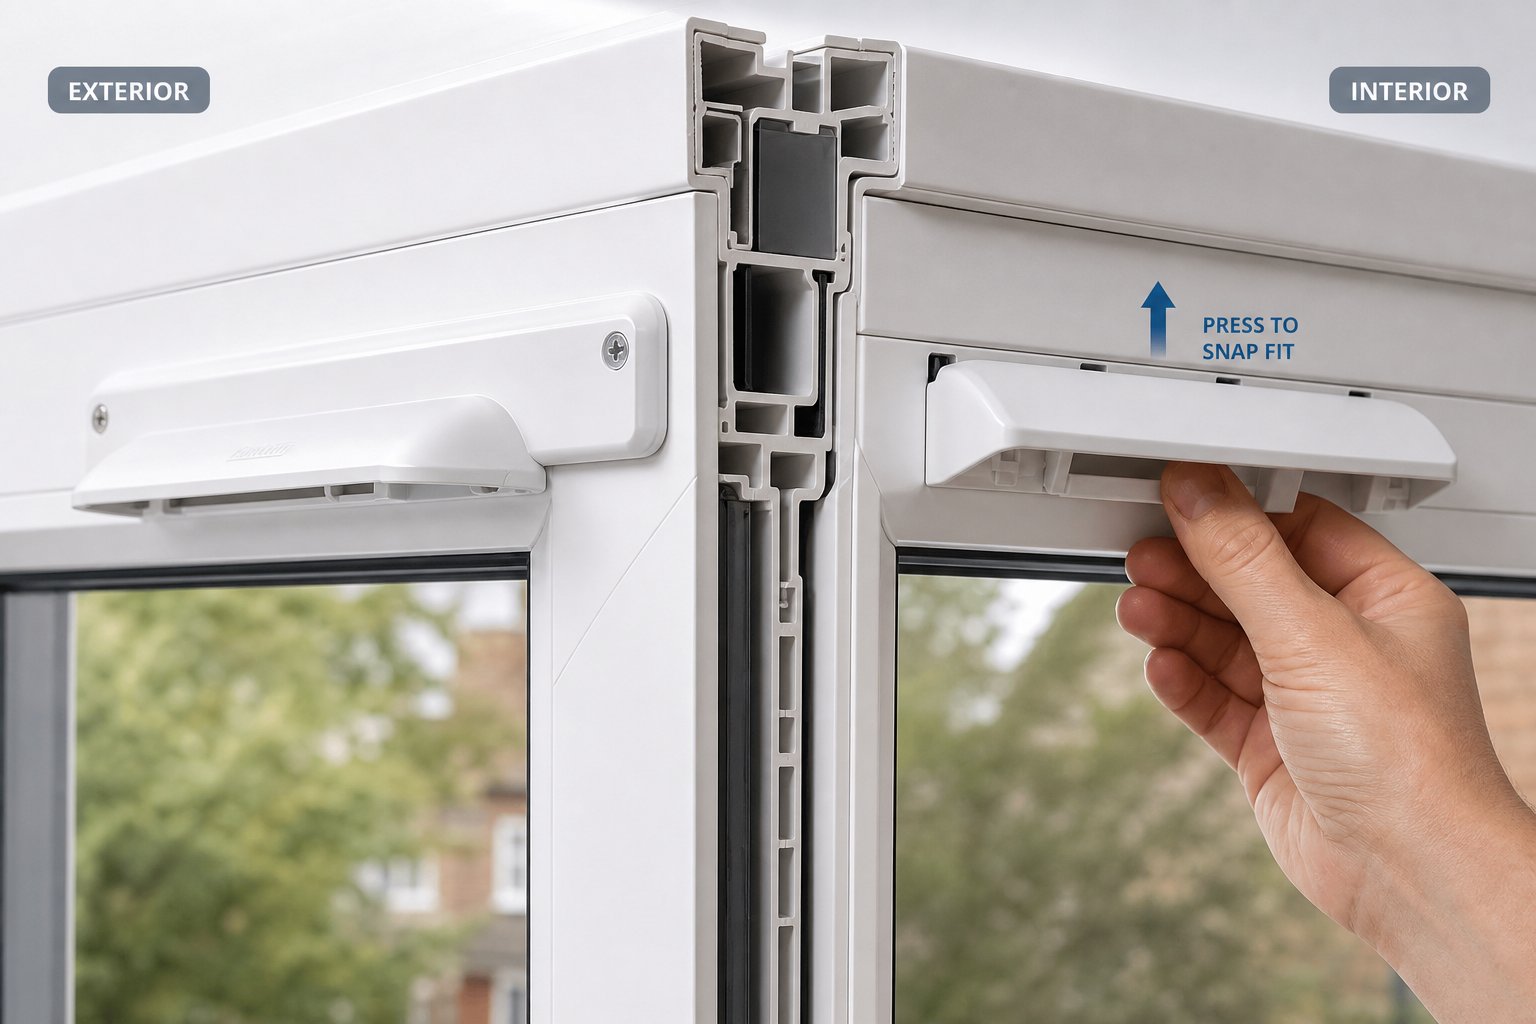
Your routed slot is clean, deburred, and free of debris. The hard, irreversible part of the job is done. Fitting the vent components into that slot is, by comparison, almost satisfying — each piece clicks or screws into a position you have carefully prepared. But "easier" does not mean "careless." The order in which you attach the parts, the torque you apply to each screw, and the way you seat the gasket all determine whether the finished vent keeps water out, lets air through, and looks invisible from the street.
Here is the rule that matters most at this stage: always start from the outside and work inward. The external component anchors everything, and the internal canopy fits over or against it. Reversing this sequence creates alignment headaches that are entirely avoidable.
The external rain deflector — sometimes called the outer canopy — is the component that faces the weather. It sits over the routed slot on the outside face of the frame, directing rainwater away from the opening and preventing wind-driven water from entering the ventilation channel. Getting this piece right is your primary defence against leaks.
Pick up the external deflector and hold it loosely over the slot, aligning the screw holes in the deflector with the pilot-hole dimples you marked through the template earlier. You will notice the deflector has a lip or hood along its top edge — this is the rain shield, and it must face upward so water runs off rather than pooling against the frame. Fitting it upside down is a surprisingly common mistake that turns the rain shield into a rain funnel.
Before driving any screws, check whether your vent kit includes a foam gasket or rubber seal strip. Many quality trickle vent kits ship with a self-adhesive gasket pre-cut to the deflector's footprint. This gasket sits between the deflector body and the frame surface, creating a watertight compression seal that compensates for any minor surface irregularities in the uPVC. If the gasket is included, peel off the adhesive backing and press it onto the rear face of the deflector — or onto the frame around the slot, depending on the manufacturer's instructions. Either way, confirm it sits completely flat with no wrinkles, folds, or lifted corners. A bunched gasket creates a gap, and a gap invites water.
With the gasket in place, press the deflector firmly against the frame and hold it steady. Drive the first screw into a central hole to anchor the piece, then work outward toward each end. The correct screw size for trickle vents on uPVC is typically a self-tapping 4 mm x 25 mm pan-head screw — and most vent kits supply exactly this size, matched to the frame wall thickness and the deflector's fixing points.
Here is where restraint matters. Tighten each screw until the deflector is snug against the frame and the gasket is compressed evenly — then stop. uPVC is a thermoplastic, not hardwood. Overtightening by even a quarter turn can crack the frame wall or strip the screw hole, leaving you with a fixing that spins freely and holds nothing. If you feel the resistance drop suddenly while driving a screw, the plastic has failed. Back out immediately, and if the hole is damaged, shift to a slightly larger diameter screw or apply a small amount of uPVC solvent cement to rebuild the grip before re-fixing.
A practical tip: if you are working at height on an upper-floor window, pre-thread one screw into the deflector loosely before positioning it. This gives you a screw to hang the deflector on while you align the remaining holes — far easier than juggling a loose component, a screwdriver, and a handful of screws on a ladder.
Move back inside. The internal canopy is the part you and your household will see and interact with every day, so its fit needs to be both functional and visually clean. This is also where modern vent design makes the job noticeably easier than it used to be.
Many current trickle vents use a snap-fit or clip mechanism for the internal canopy. Instead of requiring additional screws driven from the inside, the canopy clips directly over the screw heads or fixing lugs of the external deflector that protrude through the frame. You simply align the canopy over the slot, press firmly until you hear or feel the clips engage, and the internal side is done — no tools, no additional holes, no risk of cracking the frame with more fixings.
Products like the Shengxin uPVC Window Trickle Vent are designed around this snap-fit approach, which is particularly useful if you are fitting vents across a project that includes both aluminium and uPVC frames. The same product fits both frame types using common routed slot dimensions, eliminating the need to source separate vent models for each material. For installers working on mixed-frame properties — or homeowners who may eventually change frame materials — that cross-compatibility reduces waste, simplifies ordering, and ensures a consistent appearance across every window in the building.
If your particular vent model uses screws rather than clips for the internal canopy, the process mirrors the external side: align, pre-position, and drive the screws to snug — never beyond. Internal screws are typically shorter than external ones (often 4 mm x 16 mm) because they only need to grip the inner frame wall, not pass through a gasket and deflector body.
With the canopy secured, test the openable flap or slider mechanism immediately. Slide it to the fully open position — you should feel smooth, resistance-free movement along the full travel. Then close it completely. The flap should seat against the internal face of the canopy with a gentle seal, blocking airflow when ventilation is not wanted. If the slider sticks, binds, or refuses to close fully, the canopy is likely misaligned by a fraction of a millimetre. Unclip or unscrew it, reposition, and re-engage. Forcing a stiff slider will deform the mechanism over time, leaving you with a vent that is permanently half-open or jammed shut.
For a quick reference you can follow during installation, here is the full fitting sequence in order:
That sequence takes ten to fifteen minutes per window once you have done it once. The external deflector demands the most care because it carries the weatherproofing responsibility. The internal canopy is faster, especially with snap-fit designs, and the slider test is a thirty-second confirmation that everything works as intended.
The vent is physically installed — but a fitted vent is not the same as a verified vent. Airflow could be blocked by hidden debris inside the frame cavity, the gasket might look flush but still admit water under pressure, or the external deflector could be allowing daylight through a hairline gap you missed during fitting. Confirming performance before you pack up your tools is the difference between a job done and a job done right.
You have routed the slot, fitted the deflector, clipped the canopy, and tested the slider. The temptation to pack up your tools and call it done is strong — but a vent that looks correct is not the same as a vent that works correctly. Skipping this verification step is like hanging a door and never checking whether it latches. Everything might be fine. Or you might discover during the first rainstorm that water is streaming down the inside of your frame.
Two quick tests — one from inside, one from outside — confirm that your installation delivers what it should: controlled airflow when open and a watertight seal when closed. Both take under five minutes per window, and both can reveal problems that are far easier to fix now than after you have put the ladder away.
How do you check whether a trickle vent is working properly after installation? You do not need an anemometer or any specialised equipment. A single strip of tissue paper tells you everything.
Open the vent slider or flap to its fully open position. Tear a thin strip of tissue paper — roughly 20 mm wide and 150 mm long — and hold it loosely near the internal opening of the vent, about 10 mm from the canopy face. Do not press it against the vent; let it dangle freely from your fingertips.
With even a light breeze outside or a slight pressure difference between the interior and exterior of your home, the tissue strip should flutter visibly. The movement does not need to be dramatic. A gentle, continuous ripple confirms that air is passing through the routed slot, through the deflector baffles, and into the room exactly as intended. If you are testing on a perfectly still day with no wind, try opening an interior door on the opposite side of the room or turning on an extractor fan elsewhere in the house — either action creates enough pressure differential to draw air through the vent and move the tissue.
No movement at all? Something is blocking the airflow path. The most common culprits are straightforward to diagnose:
Re-test with the tissue strip after addressing any blockage. Repeat until you see clear, consistent flutter — that is your confirmation that the vent is delivering the background ventilation it was designed for.
Airflow confirmed? Good. Now step outside and shift your focus from performance to protection. The external rain deflector is your window's first line of defence against water ingress at the vent location, and even a hairline gap around its edges can channel rainwater into the frame cavity and eventually into the wall below.
Stand close to the window and examine the deflector from every angle. Run your fingertip around the full perimeter where the deflector body meets the uPVC frame. You should feel a continuous, even contact with no ridges, raised corners, or visible gaps. Then crouch down and look upward along the bottom edge of the deflector — this is where gaps are most likely and most dangerous, because gravity directs water straight to the lowest point.
If you can see daylight around any edge of the deflector, moisture will follow the same path. The fix is simple but demands the right product. Apply a thin, continuous bead of neutral-cure silicone sealant along the affected edge, pressing it into the gap with a gloved fingertip or a sealant finishing tool. Smooth it to a neat profile that sheds water rather than trapping it.
Why neutral-cure specifically? This is the best sealant for a trickle vent on a uPVC window because it cures without releasing acetic acid. Standard acidic-cure silicone — the type that smells strongly of vinegar during application — chemically attacks uPVC over time, causing discolouration, surface degradation, and eventual seal failure. Neutral-cure products cost slightly more but remain inert against plastic substrates for the life of the sealant. Look for products labelled "suitable for uPVC" or "plastics-safe" to be certain.
With the external seal verified or corrected, go back inside and close the vent slider fully. Hold your hand near the canopy. You should feel no draught whatsoever. A properly closed trickle vent should seal to a virtually draught-free position, offering the homeowner full control over when air enters the room. If a draught persists with the slider shut, the internal canopy may not be fully clipped into place, or the slider mechanism itself may be worn or misaligned — re-seat the canopy and test again.
One final check remains, and it requires patience rather than tools. After the first heavy rainfall following your installation, inspect the vent area from inside. Look for any water droplets on the internal canopy, moisture tracks on the frame below the vent, or damp patches on the wall beneath the window. A trickle vent leaking water after installation is almost always caused by an incomplete external seal, a gasket that has shifted, or a deflector that is not sitting flush. Catching it after the first storm — rather than discovering mould months later — gives you the chance to apply additional sealant or re-seat the deflector while the fix is still quick and inexpensive.
A properly fitted trickle vent should be virtually invisible from the street and provide quiet, controlled background ventilation without any water penetration.
If your tissue test shows clear airflow, your external inspection reveals a flush and sealed deflector, and the first rainstorm passes without a trace of moisture inside, the installation is complete and verified. That confidence is worth the five minutes these checks take — and it means the difference between a job you forget about and a job that reminds you of itself every time it rains.
Of course, not every installation goes this smoothly. Slots that end up slightly too wide, frames that crack under the router, or vents that refuse to sit flush despite your best efforts — these are real problems that real DIYers encounter mid-project. Knowing how to diagnose and fix them is the final piece of the puzzle.
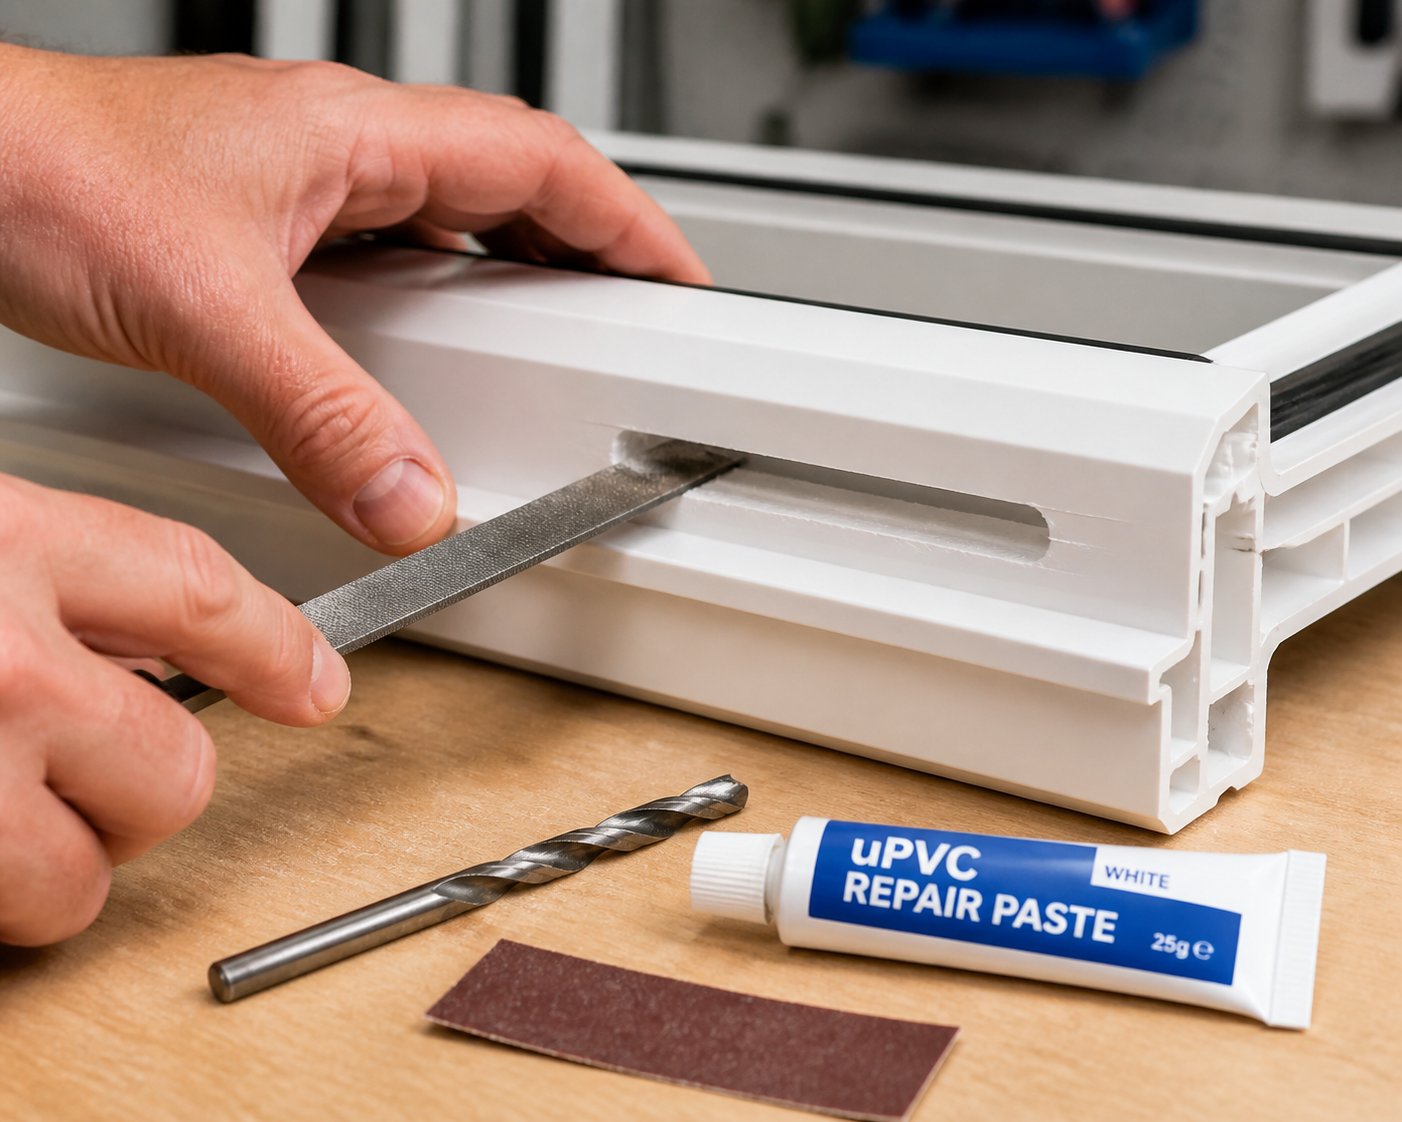
So everything was going smoothly — template marked, router humming, slot taking shape — and then something went wrong. Maybe the cutter hit something solid and stopped dead. Maybe a hairline crack appeared at the corner of the slot. Maybe the vent canopy rocks slightly instead of sitting flat. Whatever happened, you are standing in front of your window wondering whether you have just ruined a perfectly good frame.
Take a breath. Most problems that occur when fitting trickle vents to uPVC windows have practical, low-cost fixes — as long as you diagnose them correctly and resist the urge to force things. This section covers the three issues that catch DIY fitters and professional installers most often, with specific remedies for each.
You already know the theory from earlier in this guide: run a magnet along the frame head before cutting, identify steel zones, and plan accordingly. But what if you skipped that step, or the reinforcement sits in a slightly different position than the magnet suggested? Mid-route, the signs are unmistakable. The router bites into something hard, the pitch of the motor spikes upward, and forward progress stalls. That sudden resistance is galvanised steel, and forcing a standard plastic-cutting bit through it will destroy the bit within seconds.
Stop the router immediately. Do not back the bit out while it is still spinning at full speed — let it wind down first, then withdraw it cleanly. Inspect the bit. If the cutting edges are discoloured (blued or darkened), the bit has overheated and is no longer sharp enough for precise work even in uPVC. Replace it.
The primary solution is an HSS (High-Speed Steel) cutter. Swap your standard bit for an HSS-tipped router bit or HSS drill bit rated for ferrous metals, and resume the cut at a noticeably slower feed rate. Steel removes material in fine chips rather than the curly swarf uPVC produces, so give each tooth time to clear before the next one engages. Expect more noise, more vibration, and slower progress — all of which are normal.
But what if the steel bar is too thick or too wide to route through cleanly? Some reinforcement profiles span 25 mm or more in width, and cutting through that much steel on site — at height, with a handheld router — is neither practical nor safe. In that situation, you have two realistic options:
The key takeaway: hitting steel reinforcement while cutting a trickle vent slot is a setback, not a disaster. It becomes a disaster only if you keep pushing a standard bit through it.
A crack appearing during or after routing is the outcome every fitter dreads. It happens more often than installation guides acknowledge, and it has three common causes: routing too aggressively (too much depth or speed in a single pass), working on older frames where the uPVC has become brittle, or overtightening screws during the vent assembly stage.
Frames manufactured before 2000 are particularly vulnerable. uPVC loses plasticiser content over decades of UV exposure and thermal cycling, which makes it progressively more rigid and prone to fracturing under mechanical stress. A frame that flexes slightly when new may crack cleanly when routed twenty years later. If your windows are from the 1990s or earlier, extra caution — shallower passes, lighter screw torque — is not optional.
The repair approach depends entirely on the severity of the crack.
Small hairline cracks (under 1 mm wide). These are cosmetic and usually do not compromise the frame's structural integrity or weathertightness. Clean the crack with denatured alcohol or isopropyl wipes to remove dust and grease, then apply a specialist uPVC solvent cement or vinyl repair paste. Solvent cement works by chemically softening the plastic on both sides of the crack, effectively welding the surfaces together as it cures. Apply it sparingly with a fine nozzle, press the crack closed for thirty seconds, and wipe away any excess before it sets. Sand lightly with 220-grit paper once cured for a smooth finish.
Moderate cracks (1 to 3 mm wide). These may affect the seal around the vent and can allow water to migrate into the frame cavity. Use a two-part epoxy filler designed for plastic substrates. Mix according to the manufacturer's directions, press it into the crack so it slightly overfills the gap, and allow it to cure fully before sanding flush. Follow with a bead of neutral-cure silicone over the repaired area on the external face to restore the weather seal.
Large cracks, splits, or material separation. If the crack extends beyond the immediate slot area, if the frame wall has separated into two distinct pieces, or if the frame feels structurally weak when pressed, the damage has gone beyond what a surface repair can address. The frame's load-bearing capacity and weathertight seal are compromised. In this situation, professional frame repair — or full frame replacement — is the only responsible path. Continuing to fit a vent onto a structurally damaged frame risks long-term water ingress, mould growth behind the plaster, and potential failure of the entire window unit.
Prevention is always better than repair. If you are routing an older frame, make multiple shallow passes at reduced speed, pre-drill screw holes to reduce insertion stress, and never tighten fixings beyond the point where the gasket compresses evenly.
You have routed the slot, fitted the deflector, and clipped the canopy — but the trickle vent is not sitting flush on the uPVC window. It rocks slightly, a gap is visible along one edge, or the internal and external components do not seem to line up through the frame. This is frustrating but almost always fixable without starting over.
Start by identifying which of the three most likely causes is at play:
Slot slightly too narrow. If the canopy or deflector does not seat fully because the slot is fractionally undersized, widen it carefully with a flat hand file or a fine-toothed rasp. Remove material in small increments — a few strokes at a time — then test-fit the vent again. Filing is slow and controllable, which is exactly what you want when the alternative is an oversized slot you cannot shrink back.
Slot too wide. This is the trickier scenario. You cannot add material back to a uPVC frame once it has been removed. If the slot is only marginally oversize (1 to 2 mm wider than the vent body), the gasket or foam seal strip may compress enough to take up the slack and still provide a weathertight fit. If the slot is significantly oversize, a larger cover vent — one with a wider canopy footprint that overlaps the slot edges by a greater margin — can mask the error cosmetically while the gasket handles the seal. Check whether the vent manufacturer offers a wider canopy option compatible with the same external deflector before buying a completely new kit.
Internal and external slots do not align. You fitted both sides, but airflow is restricted or the canopy sits at an odd angle. The most common cause is a remaining web of uPVC or a ridge of uncut material inside the frame, left behind when the internal and external routing passes did not fully meet in the middle. Insert a long drill bit or narrow flat file through the slot and feel for resistance in the centre of the frame wall. A few passes should break through any residual membrane. Vacuum out the debris and re-test airflow with the tissue strip method.
Occasionally, misalignment stems from the pilot holes themselves being off-centre. If the drill wandered during the transfer-marking stage, the external slot may be offset from the internal slot by several millimetres. In mild cases, filing the slot edges to create a slight taper can restore enough overlap for the vent to function. In severe cases — where the two slots barely overlap — the external deflector may need to be removed, the slot widened or repositioned with fresh routing, and the deflector re-fixed. This is the most labour-intensive fix on this list, which is precisely why the earlier emphasis on drilling precise pilot holes and double-checking alignment before routing matters so much.
The table below summarises the most common problems, their likely causes, and the recommended fixes in a format you can reference quickly if something goes wrong mid-project.
| Problem | Likely Cause | Recommended Fix |
|---|---|---|
| Router stalls or bit snaps mid-cut | Hit steel reinforcement inside the frame | Switch to an HSS cutter; if steel is too wide, reposition vent 20-30 mm laterally or use two shorter vents flanking the bar |
| Hairline crack at slot corner | Aggressive routing speed or brittle pre-2000 uPVC | Clean with alcohol, apply uPVC solvent cement, press closed, and sand smooth once cured |
| Large crack or frame split | Excessive router depth, overtightened screws, or aged brittle frame | Fill with two-part epoxy if under 3 mm wide; if structural integrity is compromised, consult a professional for frame repair or replacement |
| Vent canopy rocks or does not sit flush | Slot slightly too narrow or uneven edges | Widen carefully with a flat file in small increments; deburr edges and re-test fit |
| Trickle vent slot too wide | Router wandered past markings or multi-tool cut overshot | Use a larger cover canopy that overlaps the excess; rely on gasket compression for seal |
| No airflow despite vent being open | Internal uPVC web not fully cut through, or debris blocking the slot | Pass a long drill bit or file through the slot to clear obstructions; vacuum thoroughly |
| Internal and external slots misaligned | Pilot holes drifted during drilling; templates not aligned to same reference points | File slot edges to create overlap; in severe cases, re-route external slot using corrected pilot holes |
| Screws spin freely and will not grip | Overtightened fixings stripped the uPVC screw hole | Move to a slightly larger diameter screw, or apply uPVC solvent cement to the hole, let it cure, then re-drive the original screw |
| Water ingress around the vent after rain | External deflector not seated flush, gasket shifted, or no sealant on gaps | Re-seat deflector, check gasket position, apply neutral-cure silicone to any visible gaps |
Most of these fixes take minutes, not hours. The critical habit is diagnosing the actual cause before reaching for a solution — filing a slot that is too narrow solves the problem, but filing a slot where the real issue is a debris blockage inside the frame just makes the slot wider for no reason.
If you have worked through this troubleshooting section and resolved your issue, step back and re-run the airflow and weathertightness tests from the previous stage. A repaired installation deserves the same verification as a clean one. Once the tissue flutters, the deflector sits flush, and the slider opens and closes smoothly, you have a trickle vent installation that will deliver quiet, controlled background ventilation for years — and a frame that looks exactly like it did before you started, save for one neat, purposeful addition at the top.
Not every uPVC window is suitable for a DIY trickle vent retrofit. Three conditions must be met before you start: the frame depth needs to be at least 24 mm to accept a routed slot safely, you must check for internal steel reinforcement using a magnet test (steel requires HSS drill bits rather than standard ones), and the proposed slot position must clear all locking mechanisms, espagnolette bars, and hinge-side hardware. If any of these checks fail — particularly on older or shallow-profile frames — a professional installer with specialist equipment should handle the job to avoid permanent frame damage.
In most cases, yes. Under Approved Document F of the Building Regulations (updated June 2022 for England and November 2022 for Wales), replacement windows installed through FENSA, Certass, or local authority building control must replicate or improve upon the ventilation provision of the windows they replace. This effectively means trickle vents are mandatory on the vast majority of replacement windows. New-build properties also require background ventilation meeting specific equivalent area thresholds. The only scenario with no legal obligation is when you keep your existing windows and voluntarily retrofit vents for condensation control.
Vent sizing is based on equivalent area (EA) ratings measured in mm², not physical slot dimensions. Under current Building Regulations, habitable rooms such as bedrooms and living rooms require a minimum of 8,000 mm² EA of background ventilation, while wet rooms like kitchens and bathrooms need 4,000 mm² EA alongside mechanical extract fans. A single vent rarely covers a full room requirement alone — for example, a bedroom with two windows might use one 4,000 mm² EA vent on each window. Products like the Shengxin uPVC Window Trickle Vent offer EA ratings from 2,500 to 5,000 mm² and fit standard 400 mm routed slots, making them versatile across multiple room types.
The best tool for the job is a plunge router with a 16 mm straight-flute cutter, which produces clean, factory-straight slot edges that help the vent canopy sit flush. An oscillating multi-tool with a flat cutting blade is a more accessible alternative, though it requires multiple shallow passes and a clamped straight-edge guide to keep cuts straight. You will also need a power drill with 5 mm bits for pilot holes (plus HSS bits if steel reinforcement is present), a tape measure, spirit level, masking tape, a deburring tool or fine sandpaper, and a vacuum for clearing swarf. Safety equipment — eye protection, ear defenders, and a dust mask — should not be skipped when routing uPVC.
Water ingress after fitting usually traces back to one of three causes: the external rain deflector is not seated flush against the frame, the foam gasket or seal strip shifted during screw-tightening and now leaves a gap, or the deflector was accidentally fitted upside down so its rain hood funnels water into the slot rather than away from it. To fix it, remove or loosen the deflector, inspect and reposition the gasket so it sits flat and outside the slot perimeter, confirm the deflector orientation is correct (hood lip facing upward), and re-fix. Seal any remaining gaps with neutral-cure silicone — never acidic-cure silicone, which degrades uPVC over time.



 Інтернет-сервіс
 0086 136 3563 2360
 sales@sxalu.com
 +86 136 3563 2360
 Українська
 English
 français
 Deutsch
 русский
 español
 português
 العربية
 ไทย
ไทย Việt
Việt